Ableton - Live Suite v11.0 x64 R2R [24.02.2021] - секвенсор Ableton Live
![Ableton - Live Suite v11.0 x64 R2R [24.02.2021]](/uploads/posts/2021-02/1614334796_ableton-live-suite-v11_0-x64-r2r-24_02_2021.jpg)
Ableton - Live Suite v11.0 x64 R2R [24.02.2021]
Дата Выпуска: 24.02.2021
Версия: 11.0
Разработчик: Ableton
Сайт разработчика: ableton.com
Разрядность: 64bit
Язык интерфейса: Английский
Таблэтка: Присутствует
Windows 10 (Build 1909 and later)
Intel® Core™ i5 processor or an AMD multi-core processor.
8 GB RAM
1366x768 display resolution
ASIO compatible audio hardware for Link support (also recommended for optimal audio performance)
Размер: 2.24 GB
Live позволяет вам легко создавать, производить и исполнять музыку в одном интуитивно понятном интерфейсе.
Live синхронизирует все и работает в режиме реального времени, поэтому вы можете воспроизводить и изменять свои музыкальные идеи, не прерывая творческий процесс.
Но Live также имеет революционный Session View: уникальный блокнот для импровизации, игры и исполнения с музыкальными идеями, без ограничений по времени.
Свободно и независимо запускайте и останавливайте любое количество аудио или MIDI-лупов - все остается синхронизированным. Почти все в Live работает в режиме реального времени - добавляйте, изменяйте порядок или удаляйте устройства, играйте с гибкой маршрутизацией треков Live и многим другим - и все это без прерывания творческого процесса. Создавайте более смелые звуки с новыми устройствами Live.
Оставайтесь в потоке с множеством улучшений рабочего процесса. Еще больше отдаляйтесь от компьютера с помощью Push. Создайте свой звук с помощью кураторской библиотеки. И получите неограниченный потенциал Max for Live, встроенный без проблем.
Инструкция установки и активации от старой версии, она слегка переделана для этой раздачи.
Действия почти те же. Различие лишь в названии файлов и заменой [exe]
1. Удалить или выключить установленный антивирус
2. Выключить защитник Windows
![Ableton - Live Suite v11.0 x64 R2R [24.02.2021] - секвенсор Ableton Live](https://i90.fastpic.ru/big/2019/1022/92/445fe8ed7de61107c7302d9601840392.png)
3. Скачать Ableton
3.1. Выключить интернет
4. Запустить установку от Админа

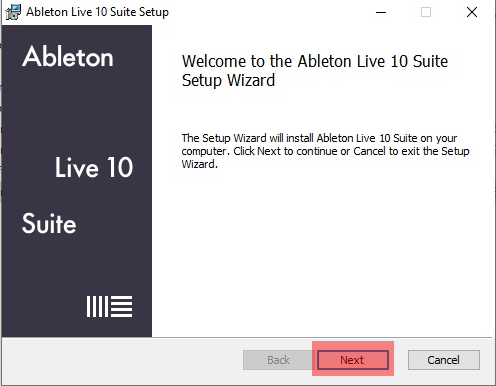
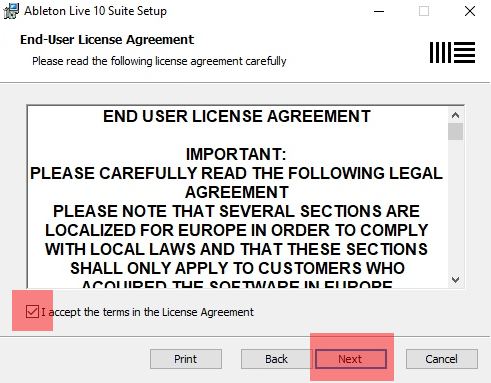
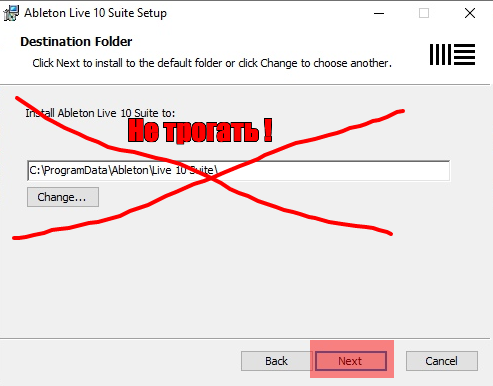
Если кнопка Next-Install не нажимается, то нужно удалить ярлык с меню пуска
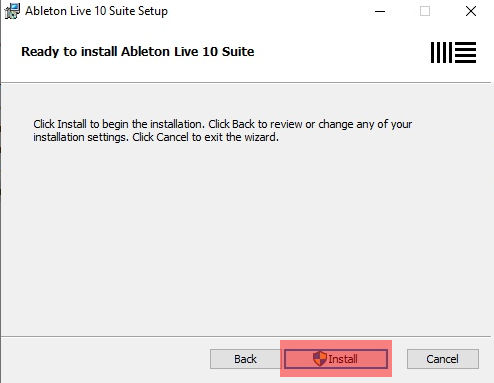
Ждем...
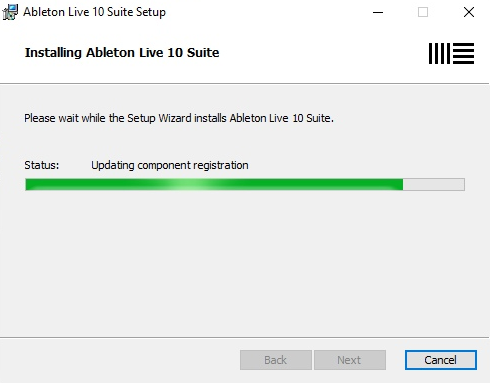
Установилась
Убрать галочку с автоматического запуска, после завершения установки
5. Если на рабочем столе нет ярлыка, то значит он в меню пуска. Перетащить оттуда ярлык на рабочий стол. Открыть папку Локальный диск (C) > ProgramData > Ableton > Live 10 Suite > Program и переместить туда с заменой Ableton Live 10 Suite.exe , он находится в папке Crack, Готово.
6. Запусти программу. Жми
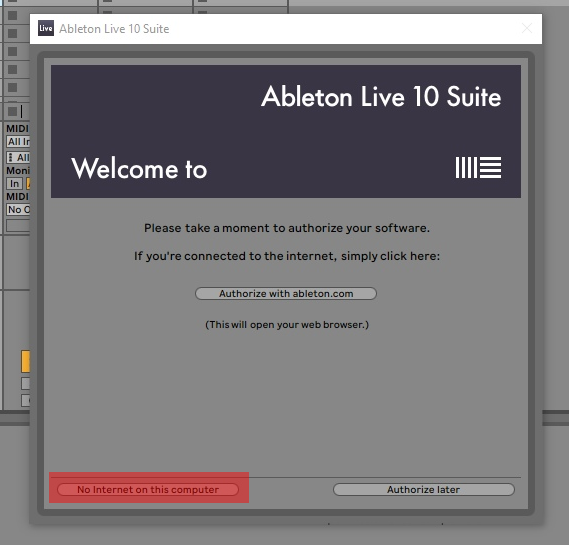
7. Жми
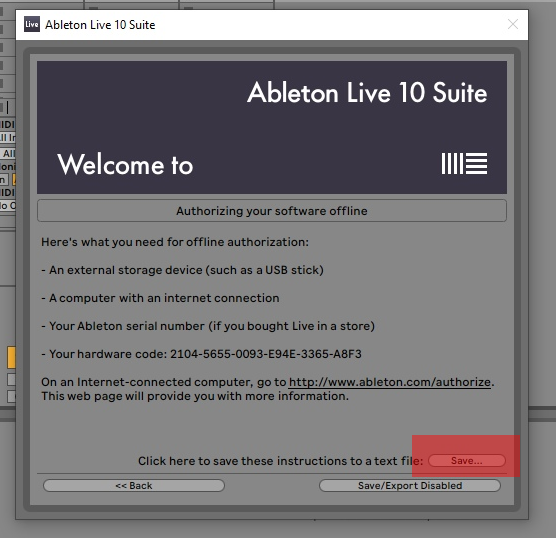
Предложит сохранить, сохрани его например на рабочий стол
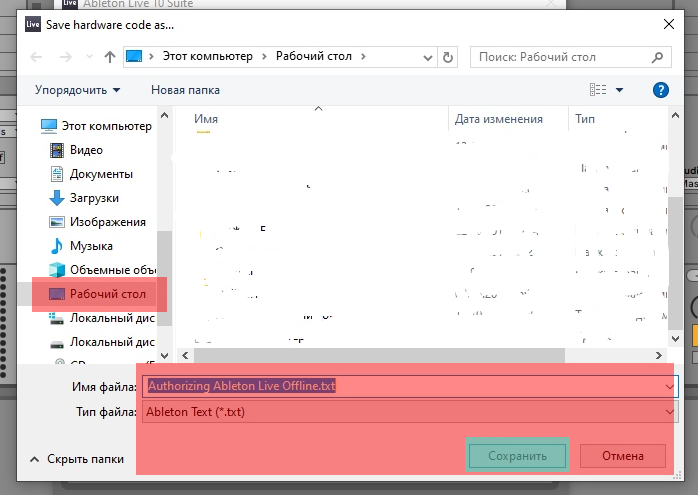
8. Сразу откроется текстовый документ и ты скопируй это
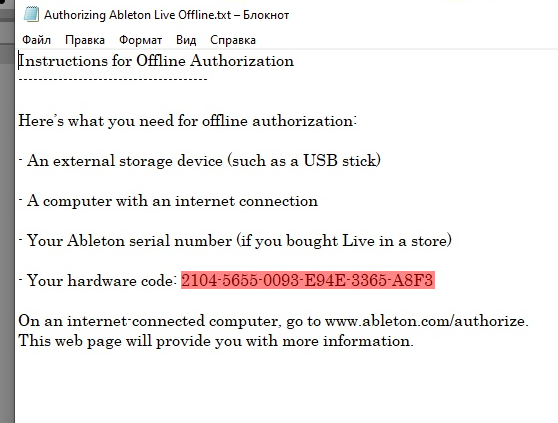
9. Запусти кейген от имени Админа. Вставь код
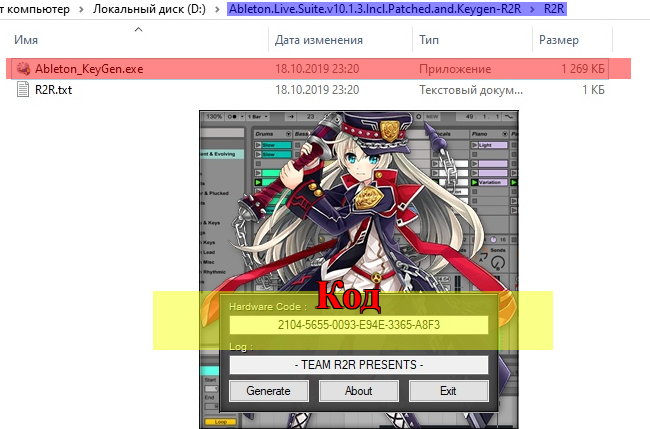
10. Жми генерировать
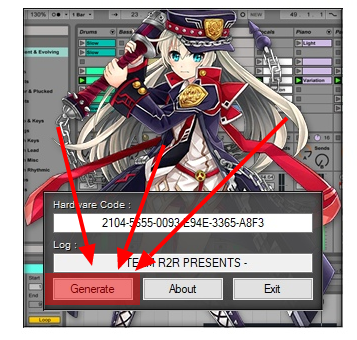
Предложит сохранить файл лицензии. Ты его сохрани хоть на рабочий стол
11. Активируй вот так. Перемести файлик лицензии на окно активации Аблетона и отпусти кнопку ну или просто кликни два раза по нему

Если не перетаскивается файл авторизации, то это означает, что вы открыли Ableton от имени администратора.
12. Отключить автообновление
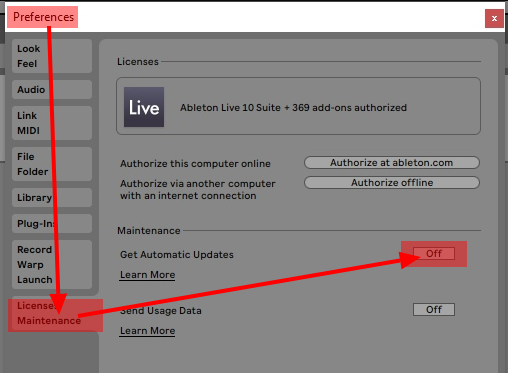
13. Вкючить интернет. Готово
Please check the Live 11 Technical FAQ for detailed information on specific topics:
https://help.ableton.com/hc/en-us/articles/360019140859
Arrangement View Improvements
Names of recorded clips in the Arrangement are now simplified and more consistent. The name consists of the track name (without the leading index number), and an index of the take number.
Upon creating a MIDI clip in the Arrangement View, the grid will start at a fixed sixteenth-note setting, as opposed to narrow-adaptive. Newly-recorded MIDI clips in the Arrangement will default to a sixteenth-note grid setting.
A new "Create Crossfades On Clip Edges" command creates four-millisecond crossfades on clip edges, when either a single or multiple adjacent whole clips are selected, or when a time selection contains more than two adjacent clips. The "Create Crossfades On Clip Edges" command is available in the Create menu, and the context menu of Arrangement clips, or via the "CMD"+"ALT"+"F" (Mac) / "CTRL"+"ALT"+"F" (Win) keyboard shortcut.
It is possible to change the selection of automation and take lane headers using the keyboard's Arrow Up/Down keys. The lane header selection can also be extended with using the "Shift" and Arrow Up/Down keys.
It is possible to move automation lanes and take lanes using the "CMD" and Arrow Up/Down (Mac) / "CTRL" and Arrow Up/Down (Win) keyboard shortcut.
Selected automation lanes or take lanes can be resized vertically by pressing "ALT" and "+" or "ALT" and "-", or by pressing "ALT" while using the mousewheel/pinch gesture. Also, when a track's main lane is selected, only that lane's height is affected.
Multiple selected automation lanes or take lanes can be resized by dragging the resize handles with the mouse. When holding the "ALT" modifier, all selected automation lanes or take lanes are resized simultaneously, similar to tracks.
A previous lane header selection is preserved after folding and immediately unfolding tracks again or when toggling Automation Mode.
When using the Zoom to Time Selection command in the Arrangement, Live now only zooms horizontally at first. When using the command a second time (without changing the time selection), Live then zooms vertically as well. Upon using the command a third time, the Arrangement returns to the first vertical zoom state.
Automation
Updated background and text colors for lane headers and clip backgrounds in Automation Mode.
Automation lane headers are now selectable with the mouse.
Clicking on an automation lane header now highlights that lane.
It is now possible to clear envelopes in automation lanes with selected lane headers, by using the "CMD"+"Backspace" (Mac) / "CTRL"+"Backspace" (Win) keyboard shortcut.
Clicking on a selected lane's Remove Automation Lane ("-") button now removes all selected automation lanes. Clicking on an unselected lane's Remove Automation Lane button removes only that lane.
Browser Improvements
A "Templates" label has been added to the Categories section of the browser. It shows template Live Sets from factory packs (including the Core library), the User Library, and other Project folders.
The current Live Set can be saved as a Template Live Set via the File menu's "Save Live Set As Template..." command.
The current Live Set can be saved as the default Live Set (which is used when creating new Live Sets) via the File menu's "Save Live Set As Default Set..." command.
Any Live Set in Live's browser can be set as the default Live Set (which is used when creating Live Sets) via the "Set Default Live Set" context menu entry.
A "Grooves" label has been added to the Categories section of the browser. It shows a flat list, similar to that within the Clips and Samples labels, of all Grooves from the Core Library as well as the User Library.
Devices in the Audio Effects label are now grouped into folders. As with other folders in the browser, it is possible to unfold more than one folder at once, by holding "Cmd" (Mac) / "Ctrl" (Win).
Ableton’s official Max for Live devices are now listed within the "Audio Effects", "MIDI Effects", and "Instruments" labels. The nodes can be expanded to reveal presets (.adv files) organized in virtual folders, if any exist. Presets outside of matching virtual folders are shown below the last virtual folder.
Drum Synth devices are now grouped in their own folder within the Instruments label.
The browser now receives the focus when opened via the "Cmd"+"Alt"+"B" (Mac) / "Ctrl"+"Alt"+"B" (Win) keyboard shortcut.
Capture MIDI
Added MPE support to Capture MIDI.
Clip/Detail View Improvements
Removed the Clip View Box selectors from the Clip View. The Clip box now contains controls available for both audio and MIDI clips, such as Start/End, Loop Position/Length, Clip Time Signature and Clip Groove.
Clicking the triangular toggle button in the Clip View's title bar shows or hides controls previously found in the Launch box, including Launch Mode, Clip Quantization, and Follow Actions.
Controls for editing samples/notes, envelopes, and note expression (for MIDI clips only) are now available in dedicated tabs to the right of the Clip box. Pressing "Alt"+"1" switches to the Samples/Notes tab, pressing "Alt"+"2" switches to the Envelopes tab, and, when a MIDI clip is selected, pressing "Alt"+"3" switches to the Note Expression tab.
The Clip Gain slider has been moved below the Transpose controls, and is now a text slider control.
The Transpose control now has a dial control for transposing in semitones, and a text slider control for fine-tune in cents (previously named "Detune").
Removed the Clip Color chooser from the Clip box.
It is now possible to rename or change the color of selected clip via the Clip box's context menu.
It is now possible to minimize/maximize the Clip box by double-clicking its title bar.
"Clip Volume" is now called "Clip Gain" in the Envelope tab's Device/Control choosers, and in the undo history.
Comping
Introduced comping in the Arrangement View. Comping makes it possible to pick the best moments of each recorded performance, and combine them into a composite track. You can record multiple takes of a musical performance without stopping recording. Live will then create and organize individual takes from this recorded material, allowing you to piece your favorite parts together. You can also drag samples from your library and use comping as a creative sample-chopping tool.
In the Arrangement View, take lanes are automatically added to armed audio and MIDI tracks during recording. Take lanes can also be inserted manually via the "Insert Take Lane" entry in the Create menu or a track header's context menu, or using the "Shift"+"ALT"+"T" keyboard shortcut. When adding a take lane via the Create menu, the take lane will be inserted after the selected lane. Otherwise, if a track is selected, the take lane will be inserted after the track's main lane. Inserting take lanes also works on multiple selected tracks simultaneously.
Take lanes are hidden by default. The visibility of take lanes can be toggled from a track header's "Show Take Lanes" context menu entry, or with a keyboard shortcut "CMD"+"ALT"+"U" (Mac) / "CTRL"+"ALT"+"U" (Win). Take lanes are only visible when Automation Mode is disabled.
Recording in the Arrangement View automatically creates a clip in a take lane.
Take lane clips can be edited like other Arrangement clips (e.g., they can be moved, copied/pasted, dragged & dropped, consolidated, cropped, etc.) They can also be copied to Session View clip slots by either copying and pasting or dragging and dropping.
Samples and MIDI files can be dragged to take lanes from the browser or Finder/File Explorer. When multiple samples are selected, pressing the "CMD" (Mac) / "CTRL" (Win) modifier key and dragging will insert each sample into sequential tracks and/or take lanes.
Selected material in take lanes can be placed in the track's main lane by pressing the "ENTER" key or via a take lane's "Copy Selection to Main Lane" context menu entry.
It is possible to replace clips in a track's main lane with the next/previous take lane clip, by selecting a clip or by making a time selection, and then pressing "CMD" and Arrow Up/Down (Mac) / "CTRL" and Arrow Up/Down (Win). If the time selection is on a take lane, it switches to the next/previous take lane clip. This also works when there is a selection of clips or time across multiple tracks, and when take lanes are hidden. (Note: empty take lanes are ignored.)
In Draw Mode, selected take lane material can be placed in the track's main lane in one single gesture by clicking, dragging and then releasing the mouse. It is also possible to quickly cycle between takes within a time selection by single-clicking on a take lane and immediately releasing the mouse.
A take lane can be auditioned by clicking the "Audition Take Lane" button (displayed as a speaker icon) in the take lane’s header, or using the "T" keyboard shortcut. When enabled, clips in the auditioned take lane will become audible and displayed in their full color, and all other lanes will be muted.
Pressing "T" toggles Audition Mode on take lanes that contain a time selection (or an insert marker) or if that take lane’s header is selected. Take lanes from different tracks can be auditioned at the same time, however only one take lane per track can be auditioned. If the time selection or lane header selection stretches across multiple lanes on the same track, the last selected lane will be auditioned.
For every Arrangement clip, Live will highlight its source material in a take lane by displaying it in full color, while dimming all unused take lane material. This makes it easier to track the recorded material that the clip originally came from. Source highlights will only be shown as long as the positions and the clip properties are matching.
Highlighted regions on take lanes can be resized to adjust the split point between two adjacent parts of a comp by dragging the edge of the highlight.
When the Clip Color toggle is set to Random in the Look/Feel Preferences, each take will be assigned a random color.
Take lane headers are selectable with the mouse. Clicking on a take lane header highlights that lane. Take lanes can be deleted via the Delete/Backspace key when their headers are selected. Take lanes can be renamed in the same way as tracks, via the "Rename" command in the Edit menu or the take lane header context menu, or using the "CMD"+"R" (Mac) / "CTRL"+"R" (Win) keyboard shortcut. Multiple selected take lanes can also be renamed simultaneously. Using the "Tab" or "Shift"+"Tab" keyboard shortcuts allows moving between lanes and tracks while renaming them. Selected take lanes can be reordered within their track via dragging and dropping. Take lanes can be selected and renamed during recording.
Take lane headers have a default info text. The info text of take lane headers can be edited using the Edit Info Text command from the context menu or the Edit menu.
Control Surfaces
The "MPK mini" control surface script is no longer available. The specific AKAI MPK mini model control surface script should now be used instead.
Control surface scripts that can control multiple banks of device parameters can now control the second set of eight Macro Controls (i.e., Macro 9-16) in Racks.
Follow Actions
Follow Actions controls can now be shown or hidden via the triangular toggle button in the title bar of the Clip View.
Follow Actions can now be assigned to scenes via the new Scene View. Clip Follow Actions will continue to run when a scene Follow Action is created or scheduled, however scene Follow Actions take precedence when triggered.
Follow Actions can be activated or deactivated using the selected clip/scene's "Follow Action" button. This button is disabled by default, and can be toggled using the "Shift"+"Enter" keyboard shortcut.
When enabling Follow Actions in a new clip/scene, Follow Action A is now set to "Next" by default.
An "Enable Follow Actions Globally" button has been added next to the Back to Arrangement button in the Session View. When disabled, no Follow Actions will occur in the Live Set, which allows editing running clips while preventing playback from jumping to other clips. When a Live Set does not contain any clip or scene Follow Actions, the "Enable Follow Actions Globally" button will appear grayed out.
A Session clip/scene with assigned Follow Actions is now indicated by a modified play button in its clip/scene slot.
Follow Action Chance A and Chance B values are now represented as percentages that sum to 100%. These values can be modified using a new slider control.
Added a marker to the Sample/MIDI Notes Editor that visualizes the Follow Action Time of a clip. This marker also allows dragging the clip's Follow Action Time. When Follow Actions are disabled via the "Enable Follow Actions Globally" button in the Master track, the Follow Action marker in the Detail View now appears in gray and black instead of green.
Added a new "Jump" Follow Action to clips and scenes. When Jump is selected, a new Jump Target slider becomes visible, to allow selecting a target clip slot/scene for the Follow Action to jump to.
Added a "Follow Action Linked" switch to the Follow Actions pane for clips. This switch is set to "Linked" by default. When the switch is set to "Linked", the Follow Action is triggered at the end of the clip or after the number of loops set in the "Follow Action Multiplier" field, and the Follow Action Time marker but cannot be moved. When the switch is set to "Unlinked", the Follow Action is triggered after the clip has played for the duration of the Follow Action Time.
Added a "Create Follow Action Chain" command to the context menu of Session clips, making it possible to set up Follow Actions so that all selected clips play in a loop. The clip selection does not have to be contiguous.
Interface Improvements
Updated Live's splash screen, application icon, and "About Live" box.
The CPU meter in the Control Bar can now display the peak CPU level. Peak CPU is a more reliable measure of CPU usage for the purpose of detecting dropouts. The percentage shown on the meter (indicating either the average or peak CPU level) can be selected from the CPU meter dropdown menu.
The Overload indicator (previously named the "Disk Overload" indicator) in the Control Bar has been redesigned, and will light up if a CPU overload has occurred. (Note: CPU overloads usually produce audio dropouts.)
CPU overload notifications can now be disabled in the Control Bar via a "CPU Overload Indication" entry in the CPU meter's dropdown menu, and in the Overload indicator's context menu.
Clicking on the new "Show/Hide CPU Meter Section" selector in the Session View's Mixer Section will open a per-track CPU metering section. Each track shows a CPU meter with six rectangles that light up to indicate the relative impact of that track on the CPU level of the current Set. Freezing or removing devices from the track with the largest impact will usually reduce the CPU load.
In the Look/Feel Preferences, the "Colors" section has been renamed "Customization".
Live’s Themes have been redesigned to provide much greater contrast.
Added a "Reduced Automatic Colors" toggle to the Look/Feel Preferences, which uses a reduced color palette when assigning colors to clips and tracks. This palette makes clips and tracks easier to tell apart with a deuteranopia, protanopia or tritanopia color vision deficiency.
Added a "Grid Line Intensity" slider to the Look/Feel Preferences, allowing for more pronounced or dimmed appearance of grid lines in the Arrangement and Detail Views.
On Windows, the progress of dialogs (such as the Export Audio dialog) is now displayed in the taskbar.
Progress dialogs now show their progress value below the bar, for easier reading in all Themes.
The scrollbar in the Help View now matches the colors of the scrollbar in the browser and the Groove Pool.
The vertical zoom level on the piano roll is now increased when dragging horizontally on the Note Ruler.
Added an "Arm Track" command to the Edit menu. If multiple tracks are selected, the command appears as "Arm Tracks". If the selected track is armed, the command is replaced with "Disarm Track". It is now possible to arm selected tracks using the "C" shortcut key.
Changed the font color of the "Drop Instrument Here" text in the Device View for improved contrast.
Reorganized the Edit menu for improved usability and accessibility, and added a new "Solo/Unsolo Track" entry.
Key/MIDI-mapped functionality for the "Set Start/End", "Set Loop Position/Length", and "Nudge Backward/Forward" buttons is now disabled whenever the corresponding controls in the GUI are disabled.
The "Browse Groove Library" context menu entry has been removed from the Groove Pool.
The Groove Pool now opens automatically when:
loading a groove file from the browser by double-clicking or pressing the Enter key
adding a groove to the Groove Pool (e.g., by dragging and dropping it onto an existing MIDI clip)
extracting grooves
Linked-Track Editing
Introduced linked-track editing in the Arrangement View. Linked-track editing makes it possible to use comping workflows and other phase-locked editing operations on multiple tracks at once. Any tracks in the Arrangement View can now be linked so that their content can be edited simultaneously. There can be multiple instances of linked tracks in a Set, however each track can only belong to one of these instances.
Linked tracks are indicated by a "link" icon button in their headers.
Clicking on a track's link icon selects all tracks that are linked together.
Hovering a track's link icon highlights tracks that are linked together.
Tracks can be linked by selecting them and then choosing "Link Tracks" from the context menu. To link tracks inside a Group Track, right-click on the Group Track header and choose "Link Tracks" from the context menu.
To unlink all tracks in an instance of linked tracks, right-click on the link icon button to select all tracks in that instance and open the context menu, and then choose "Unlink Track(s)" from the context menu. When unlinking tracks inside a Group Track, is it also possible to right-click on the Group Track header and choose "Unlink Track(s)" from the context menu.
To link an additional track to an instance of linked tracks, first click on the link icon button, to select all tracks in that instance. Then, add more tracks to the selection while holding the "CMD" (Mac) / "CTRL" (Win) key, and choose "Link Tracks" from the context menu.
To remove one or more tracks from an instance of linked tracks, select the corresponding track header(s) and choose "Unlink Track(s)" from the context menu.
Any subset of linked tracks, or a mix of linked and unlinked tracks, can be linked together by selecting their track headers and clicking the "Link Tracks" command in the context menu.
The following controls and operations are synced on linked tracks:
Track editing and time selection operations (e.g., Cut, Copy, Duplicate Time, Delete Time, etc.)
The state of Arm buttons
Take lane editing and time selection operations, such as auditioning, renaming, inserting and deleting take lanes (note: this also applies when take lanes are hidden in some linked tracks)
Fade operations, when clip edges have matching time positions
When one or more track headers are selected, pressing "Cmd" (Mac) / "Ctrl" (Win) and clicking on a track's link icon will select the originally selected track, as well as all linked tracks belonging to the linked track's instance.
When one or more track headers are selected, pressing "Shift" and clicking on a track's link icon will select all tracks from the originally selected track to the newly-clicked track, as well as all linked tracks belonging to the linked track's instance.
Matching fades on linked tracks can be adjusted relative to their original values. When linked tracks have matching fades, dragging the fade handles to their original start/end clip edges, then releasing the mouse, and then dragging the fade handles to their opposite clip edges will still result in fades of equal length.
Max for Live Improvements
Updated the bundled Max build to version 8.1.9. For the changelog, visit: https://cycling74.s3.amazonaws.com/support/version_8_1_9.html
When a parameter is controlled by a Max for Live device, a message in the Status Bar now shows exactly which device controls the parameter, and which track contains the device. The context menu of the controlled parameter now provides a "Go to Controlling Device" option.
A parameter that is controlled or automated by a Max for Live device will no longer incur a one-buffer delay in the signal sent by Max for Live, if the device containing the controlled parameter is positioned later than the Max for Live device in the device chain. The original delay behavior can be restored using the "-AlwaysDelayMaxForLiveMappings" debug option in the Options.txt file.
The following improvements have been added to MIDI routing:
It is now possible to route MIDI to and from Max for Live audio effects.
Max for Live instruments can now send out MIDI.
The new inputs and outputs are routable and show up in a track's "MIDI From" and "MIDI To" choosers.
Similar to audio routings, the Live API can control the routable MIDI inputs and outputs.
The Max for Live API now has access to:
A redesigned, extendable note API for Live 11's new note features (i.e., note probability, velocity range and release velocity). This new API is required for modifying notes without losing MPE data.
The sample rate of a Sample loaded in Simpler.
The slices of a Sample loaded in Simpler.
A Clip or Sample's warp markers.
The Clip launch properties: Legato mode, Launch mode, Clip quantization and Velocity amount.
Arrangement View Clip IDs in a Track.
Adding or removing Macro Controls in a Rack.
Macro randomization.
Macro Control variations.
The Live Set's Groove Pool.
A Groove's properties.
The Max for Live category in the Max Patcher Inspector window contains a new attribute "Patch supports MPE", to enable MPE for devices that make use of MPE features.
MIDI Clip Scales
A new Scale Mode can be enabled/disabled via the "Scale" button in the Clip box of MIDI clips. At the right side, "Root Note" and "Scale Name" choosers allow setting a root note and scale for the selected clip(s). When a selected clip has Scale Mode enabled and a scale is selected, notes belonging to the scale are highlighted in the piano roll. By default, key tracks belonging to the selected scale are highlighted in the MIDI Note Editor, and the root note is indicated by a prominent highlight in the piano roll. Scale highlighting can be toggled on or off, by pressing the "K" shortcut key while the MIDI Note Editor is in focus, or via the "Highlight Clip Scale" context menu and View menu entry.
Newly-created MIDI clips inherit the previously edited or viewed clip scale, even if they have Scale Mode disabled. When editing multiple clips with different key and scale settings, any foreground clip with Scale Mode enabled now updates the global settings that are used to initialize the next created clips, as well as Push's key and scale.
When a selected clip has Scale Mode enabled and a scale is selected, pressing the new "Scale" ("Fold to Scale") button (at the right of the "Fold" button) folds to key tracks containing notes, as well as key tracks belonging to the scale.
It is now possible to set a preference for spelling a clip's notes with flats, sharps, or both, via the piano roll's context menu. An additional "Auto" option automatically selects flats or sharps based on the position of the root note in the circle of fifths.
MIDI Note Editing
A new Chance Editor allows setting the probability of a MIDI note occurring in a playing clip. Dragging a note's probability marker up and down changes the probability value between 0-100%. The Chance Editor lane is hidden by default.
The Velocity and Chance Editor lanes can be shown or hidden via the lane selector toggle buttons at the left. Underneath the lane selector toggle buttons, a triangular toggle button allows showing/hiding all enabled lanes at once. When both lane selectors are hidden/disabled, pressing the triangular toggle button will show both lanes at once.
The Velocity and Chance Editor lanes can be resized individually via their split lines.
The Velocity and Chance Editor lanes can be resized at once by dragging the split line between the lanes and the MIDI Note Editor.
A "Randomize" button allows randomizing velocity/probability values for selected notes (or notes with selected markers), depending on the focused lane. If no markers are selected, values for all notes will be randomized.
A "Randomize Range" slider, at the right of the Randomize button, allows specifying a randomization range that can be applied to velocity/probability values. The slider's randomization value can be typed as a number with the keyboard, and triggers randomization when validated using the "Enter" key.
Notes with probability values less than 100% will display a little triangle on their upper-left corners. When a key track height is low enough, this triangle will disappear.
It is possible to edit probabilities for selected notes in Draw Mode.
Updated the appearance of Velocity markers.
The value of dragged velocity/probability markers is now indicated on the scale inside the respective lane header, instead of with a value box.
It is now possible to edit values for selected velocity/probability markers using numerical keys.
Holding the "Shift" key allows fine-tuning the values of selected velocity/probability markers.
When using the Arrow Up/Down keys with "Cmd" (Mac) / "Ctrl" (Win) held down, the values of selected velocity/probability markers are incremented by +/-10.
It is now possible to edit velocity values for selected notes using numerical keys.
It is now possible to see and edit a velocity range, from which a velocity value is selected when a note is played. In the Notes tab, a "Velocity Range" slider allows assigning velocity ranges to selected notes (or all notes in a single clip, if none are selected). Alternatively, holding "Cmd" (Mac) / "Ctrl" (Win) and dragging vertically on a velocity marker reveals a horizontal handle, which, when dragged up or down, sets the maximum or minimum velocity range value. The velocity range is indicated by the shaded area between the horizontal handle and the velocity marker. Double-clicking the velocity marker will reset the range to 0.
In the Velocity Editor, when using the Arrow Up/Down keys with "Cmd" (Mac) / "Ctrl" (Win) held down, the velocity ranges of selected notes are incremented by +/-10.
In the Velocity and Chance Editors, drawing ramps for selected notes or notes in a selected key track is now possible by holding the "Cmd" (Mac) / "Ctrl" (Win) modifier when Draw Mode is activated.
It is now possible to choose between two different Draw Mode options. In the Record/Warp/Launch tab of the Preferences, a new "MIDI Note Drawing" section has a "Draw Mode with Pitch Lock" option. When enabled, drawing MIDI notes is constrained to one single key track (or pitch) at a time, while holding the "ALT" key allows freehand melodic drawing. When disabled, Draw Mode defaults to melodic drawing, and holding the "ALT" key enables pitch-locked drawing. The "Melodic" Draw Mode can be used to erase notes, when drawing starts on an existing note. When the MIDI Note Editor is focused, the "Draw Mode" entry in the Options and context menu now display the currently selected state of the "Draw Mode with Pitch Lock" preference, as "Pitch Lock On/Off".
It is now possible to change the note selection in the MIDI Note Editor using the "Alt"+Arrow Up/Down keys (Mac) / "Ctrl"+Arrow Up/Down keys (Win).
MPE Support & Editing
Added support for MIDI Polyphonic Expression (MPE). It is now possible for Live to receive per-note expression from an MPE-capable MIDI controller, by enabling MPE Mode in the Link/Tempo/MIDI Preferences. When a MIDI controller that has MPE Mode enabled is selected as an input device on a track, the channel input routing is fixed to "All Channels" and no individual channels can be selected.
The Clip View's new Note Expression tab allows editing five dimensions of MIDI Polyphonic Expression (MPE) for each note in a clip: Pitch (per-note pitch bend), Slide (per-note Y-Axis), Pressure (Poly Aftertouch/MPE Press), Velocity and Release Velocity (Note-Off Velocity). This makes it possible to refine the expression of recorded material, or to automate polyphonic sound variations for MPE-capable instruments.
The Slide, Pressure, Velocity, and Release Velocity dimensions are displayed inside new expression lanes below the MIDI Note Editor.
Each expression lane can be shown or hidden via the lane selector toggle buttons at the left. Underneath the lane selector toggle buttons, a triangular toggle button allows showing/hiding all enabled lanes at once. When all expression lane selectors are hidden/disabled, pressing the triangular toggle button will show all expression lanes at once.
Each expression lane can be resized individually via their split lines.
All expression lanes can be resized at once by dragging the split line between the lanes and the MIDI Note Editor.
Pressing "ALT" and clicking the "Show/Hide All Expression Editors" button displays all expression lanes, regardless of their previous states. When hiding the expression lanes using the "Show/Hide All Expression Editors" button, or by dragging the "Expression Editor View Split", the lane visibility toggles are hidden as well.
When clicking a note (or any of its expression dimensions) in the MIDI Note Editor while the Note Expression tab is open, the note will appear in a transparent overlay. Breakpoints appear, allowing to edit the note's Pitch, Slide, and Pressure envelopes, while markers can be used to edit the note's Velocity and Release Velocity values. Unselected notes will appear grayed out, and their expression envelopes will be dimmed.
It is possible to edit expression envelopes for multiple selected notes at once. The expressions are scaled proportionally, similar to that of velocities for multiple selected notes.
In the Note Expression tab, the grid is disabled by default for easier editing at a finer resolution. The grid's settings are separate from the grid in the other tabs, and they are saved with the clip.
All expression dimensions can be edited in Draw Mode.
When a note is moved, its expression envelopes will move along with it.
Pitch envelopes are displayed on top of their corresponding notes in the MIDI Note Editor.
Pitch breakpoints snap to the nearest semitone when pressing "Cmd" (Mac) / "Alt" (Win) while the grid is off. This also works for Pitch values in Draw Mode. This behaviour can be inverted using the same shortcuts when the grid is on.
Pitch envelopes are hidden when Fold Mode is enabled in the Note Expression tab.
Multi-Clip Editing
It is now possible to select and edit notes from multiple selected clips at the same time in the MIDI Note Editor. The new "Focus" button enables Focus Mode, which allows editing the current foreground clip only. Focus Mode can be toggled via the "N" keyboard shortcut. Holding "N" while editing with the mouse toggles Focus Mode momentarily.
Loops are now visible and editable via mouse interactions. It is possible to select/edit several multi-clip loop bars at once, by clicking them/dragging their loop markers while pressing the "Cmd" (Mac) / "Ctrl" (Win) modifier key. In Focus Mode, it is not possible to select more than one multi-clip loop bar at a time, and any existing multi-selection is ignored.
When Focus Mode is disabled, It is possible to create a contiguous multi-selection of multi-clip loop bars by clicking them while holding the "Shift" modifier key. When Focus Mode is enabled, any existing multi-selection is ignored.
When multiple clip loops or or their loop start/end markers are selected, the selection is retained when dragging another one of these parameters without using keyboard modifiers.
The loop bar region is vertically resizable.
All controls in the Clip box and Notes tab of the Detail View that were previously only visible for a single selected MIDI clip now also appear when multiple MIDI clips are selected. When Focus Mode is enabled while multi-clip editing, the loop length controls and Notes tools are now available for editing the active clip.
Previously when crossing a loop boundary while making a rubberband selection, all notes were selected. Now, only the notes that are inside the selection rectangle are selected.
When Focus Mode is enabled, the title bar of the Clip box in the Detail View now appears in the active clip's color.
When Focus Mode is disabled, "Scale" is enabled and will fold key tracks according to the scales of all clips in the selection that have Scale Mode enabled. "Scale" is disabled if none of the clips in the selection has Scale Mode enabled.
When Focus mode is enabled, "Scale" is enabled and folds key tracks to the scale of the foreground clip, if the foreground clip has Scale Mode enabled. "Scale" is disabled if the foreground clip has Scale Mode disabled.
It is now possible to transpose notes across multiple selected clips using the Transpose control in the Notes tab.
The Invert button is now enabled in the Notes tab when at least one note is selected, and it is possible to invert selected notes from multiple clips at the same time. The inversion is not applied on a per-clip basis, but for the selection as a whole - as if all selected notes belonged to one clip.
It is now possible to use the Set Loop Position and Set Loop Length buttons when multiple MIDI clips are selected and playing.
It is now possible to use the Loop Position and Loop Length controls when multiple MIDI clips are selected.
It is now possible to use the Nudge Backward/Forward buttons when multiple MIDI clips are selected.
New Devices and Device Improvements
The old Chorus, Flanger, and Phaser devices have been deprecated. They are still accessible via a Legacy folder in the Core Library under Devices -> Audio Effects.
The number of visible Macro Controls in Instrument Racks can now be controlled from a Max for Live device or a control surface.
Added MPE support to Drum Racks and Instrument Racks. Per-note expression is forwarded through Racks.
Added MPE support to all built-in MIDI effect devices. Per-note expression is forwarded through these devices.
The Arpeggiator device now supports modulating the root notes of an arpeggio via MPE. (Note: MPE modulation is not applied to transpositions generated by the device.)
Added support for MPE and Push 2's "Poly" Pressure mode to the External Instrument device.
Toggling MPE Mode in a plug-in device is now possible via the device's context menu. When MPE is enabled, an indicator appears on the device's title bar. Plug-in devices that support MPE now have MPE Mode enabled by default.
Sampler:
Sampler now supports MPE. It is now possible to use MPE/Push 2's Pressure mode to modulate individual notes in the Sampler device. MPE modulation can be dialled in via Sampler's MIDI tab.
In the MIDI tab, the Pitch Bend Range control has been repositioned and two new modulation sources have been added: "Note PB" (per-note pitch bend) and "Slide" (per-note Y-Axis).
In the MIDI tab, Aftertouch has been repositioned and renamed to "Press". Depending on the data sent to the instrument, Press is handled either monophonically (as Channel Aftertouch) or polyphonically (as Poly Aftertouch or MPE Press).
Added an "MPE" text label to the right corner of the Sampler device's title bar.
Simpler:
Simpler now supports MPE. It is now possible to use MPE/Push 2's Pressure mode to modulate individual notes in the Simpler device.
By default, Simpler supports Note PB (per-note pitch bend) with a range of +48 semitones.
It is possible to use Sampler's MPE Slide and Press parameters in Simpler, after an instance has been converted from Sampler.
Added an "MPE" text label to the right corner of the Simpler device's title bar.
Wavetable:
In the MIDI tab, "AT" (Aftertouch) has been renamed to "Press". Depending on the data sent to the instrument, Press is handled either monophonically (as Channel Aftertouch) or polyphonically (as Poly Aftertouch or MPE Press).
Wavetable can now be fully controlled using MPE controllers. MPE modulation can be dialled in via the new MPE tab, which contains four columns: Velocity, Note PB (per-note pitch bend), Slide (per-note Y-Axis) and Press (aftertouch). All MPE modulation sources now appear in the device's expanded view.
Added an "MPE" text label to the right corner of the Wavetable device's title bar.
Collision:
Updated the appearance of the Collision device's UI.
Corpus:
Updated the appearance of the Corpus device's UI.
Electric:
Updated the appearance of the Electric device's UI. The "Tine" and "Tone Bar" parameters are now consistently named.
Tension:
Updated the appearance of the Tension device's UI.
Chorus-Ensemble:
Introduced "Chorus-Ensemble", a new audio effect device for Live. Chorus-Ensemble provides three different effect modes:
Classic is a thickening chorus effect. A high-pass filter allows removing the chorus signal from low frequencies. The width of the chorus signal can be adjusted; this is useful for complex mixing tasks. The feedback signal can be inverted, which results in a "hollow" sound when combined with high feedback values.
Ensemble is based on and shares controls with the Classic mode, while adding a third phase-shifted delay line for a thicker chorus sound.
Vibrato applies stronger modulation than a chorus to create pitch variation. The shape of the modulation waveform can morph seamlessly from a sine to a triangle, and be used to create well-known "police siren" sounds.
Global controls allow setting the modulation rate and amount, output gain, and harmonic saturation (via the "Warmth" parameter).
Hybrid Reverb:
Introduced "Hybrid Reverb", a new audio effect which allows blending a convolution reverb with a number of reverb algorithms. Besides providing a selection of impulse responses, the device allows dragging any audio file into the device to be used for the convolution processing, as well as shaping the envelope and size of impulse responses via dedicated controls. An algorithmic section contains several reverb modes, each providing a different set of parameters and sonic properties: Dark Hall, Prism, Quartz, Shimmer, and Tides. The convolution and algorithmic sections can be routed either in series or parallel, and their volume relationship can be continuously adjusted via a Blend control. An EQ section can be used to shape the reverb sound, and a "Pre Algo" toggle allows excluding the convolution engine from the EQ. A "Vintage" control introduces a degradation of the signals, to emulate the behavior of older digital reverb units.
MPE Control:
Introduced "MPE Control", a Max for Live MIDI effect that allows shaping and transforming incoming MPE modulation for Pressure (polyphonic aftertouch, Slide (per-note Y-Axis) and Pitch (per-note pitch bend). The MPE data is transformed via curves, which can consist of either two or three breakpoints. MPE Control also allows smoothing modulation data and can convert MPE data to global MIDI, so that non-MPE instruments can be modulated monophonically via an MPE controller as well.
Phaser-Flanger:
Introduced "Phaser-Flanger", a new audio effect device for Live. Phaser-Flanger combines the functionalities of the Phaser and Flanger devices into one, as separate effect modes. The Phaser mode has a new, lusher sound with increased frequency and modulation ranges, while the previous Earth and Space modes have been replaced with more expressive parameters. Also included is a new Doubler effect mode.
Redux:
Upgraded the Redux device. New parameters allow creating a wider range of sounds, from harsh distortion to digital and aliasing artifacts, through to warm and fat 8-bit sounds. Jitter adds noise to the downsampling process. Filters can be enabled pre/post downsampling, while the post-filter cutoff frequency can be adjusted. A Shape parameter allows transforming the quantizer's curve. DC Shift and Dry/Wet controls are also available.
Spectral Resonator:
Introduced "Spectral Resonator", a new audio effect device for Live. Based on spectral processing, Spectral Resonator uses spectral resonances and pitched overtones to add tonal character to any audio source. MIDI sidechain parameters allow processing any material in key with its surrounding musical elements. Spectral Resonator can be played polyphonically in MIDI mode with up to 16 voices. Spectral Resonator offers several spectral processing types on the input signal, including spectral filtering, spectral chorus, and granularization.
Spectral Time:
Introduced "Spectral Time", a new audio effect device for Live. Spectral Time combines time freezing and spectral delay effects in a single inspiring device. The freeze and delay effects can be used together or independently, allowing for a wide range of possibilities, such as sustaining any sound infinitely, or combining delays with time-synced fade transitions.
Max for Live Device Updates
Added support for MPE input to/output from Max for Live devices. When a Max for Live device has MPE Mode enabled, MIDI output from the device will be interpreted as MPE. Additionally, when a Max for Live device is disabled, MPE will be forwarded through the device's dry signal path.
The Expression Control device now allows assigning an additional parameter as a mapping target. Pressing a new button in the upper right corner of the LED opens a new view, where each modulation target can be transformed via curves and breakpoints. New modulation sources have been added to the device:
Expression (Expression Controller, MIDI CC 11)
Random (allows generating a random modulation value per note)
Incremental (allows adding a fixed amount to the modulation value with each new note)
Slide (per-note Y-Axis, converted to monophonic modulation data; useful when controlling effects in a device chain via an MPE controller)
Sustain (Sustain Pedal, MIDI CC 64)
All Max for Live devices have been moved inside the application bundle (previously, they lived in the Core Library), to ensure that using Collect All and Save will not create redundant copies of the devices.
Improved waveform drawing in the Shaper and Envelope Follower devices.
Push
Added a "Pressure" switch to Push 2's Setup Menu (shown when pressing the Setup button) that allows toggling between monophonic and polyphonic aftertouch when playing melodic instruments. The state of this switch is stored in Live's preferences. Push 2 and MIDI controllers sending polyphonic aftertouch can be used with plug-in devices that support polyphonic aftertouch.
When Push 2's Pressure mode is set to "Poly", the Repeat button now produces notes at full velocity when Accent is enabled.
When a Rack contains a parameter mapped to one of the new Macro Controls (i.e., Macro 9-16), the additional Macro Control parameters will appear in a new device within the Rack. Degree symbol icons (Push 1) or bullet point icons (Push 2) are used to differentiate the Rack from the device. The new device is only visible when the Rack is open, but otherwise behaves exactly the same as the Rack.
Push MIDI Clip Mode
When Push's In Key/Chromatic is set to In Key Mode, and the selected MIDI clip has Scale Mode enabled, selecting a scale on Push will update that clip’s scale in Live. If Focus Mode is enabled in multi-clip editing, only the foreground clip's key and scale will be updated in Live.
When Push's In Key/Chromatic is set to In Key Mode, and the selected MIDI clip has Scale Mode enabled, selecting a scale in Live will change the pad layout on Push.
Rack and Macro Control Improvements
Pressing the "Rand" button in the title bar of a Rack randomizes the values of mapped Macro Controls. A mapped Macro Control can be excluded from randomization via the "Exclude Macro from Randomization" context menu option. Volume Macros in Instrument Rack presets are excluded from randomization by default.
A new "Show/Hide Macro Variations" view selector button in Racks opens a view that allows storing the state of the Macro Controls as a variation preset via the "New" button. By default, each stored variation will be named sequentially as "Variation 1", "Variation 2", etc. A variation can be renamed, duplicated or deleted via its context menu, the Edit menu, or using keyboard shortcuts. A variation can be launched in its stored state via the "Launch Macro Variation" button to the right, or overwritten via the "Overwrite Macro Variation" button to the left. Additional controls are visible in Key/MIDI Map Mode.
The maximum number of available Macro Controls in Live has been doubled to 16. New "+" and "-" view selector buttons in Racks allow setting how many Macro Controls are shown or hidden. The state of the shown and hidden Macro Controls is saved in the Live Set. When the title bar of a Rack is narrow enough, the Rand and Map buttons will appear as "R" and "M".
Added a context menu entry that excludes a Macro Control from changing when a different Macro Control variation is launched. Unchecking the context menu entry will re-enable changes to that control as before, as the values are still stored in the variation.
Session View Improvements
In the Default Live Set, scene name fields will be empty and no longer contain numbers.
Scene numbers are now displayed in a new column in the Master track.
Scene numbers are determined by their position. When a scene is moved, its number changes according to the scene's new position.
Selecting a scene (or multiple scenes) now opens the new Scene View, which allows editing the selected scene's tempo, time signature and Follow Actions.
Dragging the left edge of the Master track's title header reveals two new controls, which allow assigning a tempo or time signature to a scene. When enabled, these controls can be disabled and reset via a context menu or pressing the Delete key. It is also possible to disable the controls by double-clicking them. Clicking a Scene Tempo or Scene Time Signature control opens the Scene View.
When a scene or clip slot is selected, the Arrow Right/Left keys can now be used to navigate to the Scene Tempo/Time Signature controls.
When a Scene Tempo/Time Signature control is selected in the Master track, pressing "Enter" once will select the respective scene header. Pressing "Enter" again launches the selected scene.
When editing a scene name, tempo or time signature value in the Master track using the keyboard, using the "Tab" or "Shift"+"Tab" keyboard shortcut navigates to the next or previous control, to allow editing these controls quickly. The navigation moves to the next or previous scene when reaching the last or first control in a scene.
Sets created in Live 10 that have tempo and/or time signature values specified by scene names will have their values migrated to the new Scene Tempo/Time Signature controls, and, when such Sets are first opened in Live 11, the Master track is widened so that the Scene Tempo/Time Signature columns are visible.
In the Scene View, if a scene does not have a name, and only one scene is selected, the word "Scene" is displayed in the title bar. The scene number is displayed on the right-hand side of the title bar.
It is now possible to rename multiple selected clips at once, via the Rename command in the context menu or Edit menu, or using the "CMD"+"R" (Mac) / "CTRL"+"R" (Win) keyboard shortcut.
Added a "Cancel Scene Launch" entry to the Master track's context menu. Clicking this entry cancels the launch of any previously triggered scene.
Added a "Cancel Scene Launch" button to the Master track in Key/MIDI Map Mode.
It is now possible make the Master track narrower, so that Master Volume value labels can be hidden. The "Solo" label of the Solo/Cue Mode switch in the Master track now appears centered.
The "Stop All Clips" button in the Master track now flashes when clicked, and blinks while fired and waiting for the next launch period, similar to all other "Clip/Scene Launch" and "Clip/Scene Stop" buttons. This also works when a scene's "Stop" Follow Action is triggered.
Setup
Live requires macOS 10.13 or later.
Live's Status Bar will now indicate when an update for Live is being downloaded. Once it is downloaded, the Status Bar will state that Live must be restarted in order to apply the update. It is possible to change this default behavior, so that Live will first ask for permission before applying a new available update. To do so, go to Preferences -> Licenses/Maintenance and set Get Automatic Updates to Ask Me. The next time an update for Live is available, the Status Bar will display buttons for choosing whether or not to apply the update.
ReWire support has been removed.
Tempo Follower
Introduced the Tempo Follower, which adapts Live’s tempo to stay in time with a drummer or another rhythmic audio source. In the Preferences via the "Link/Tempo/MIDI" tab (previously named "Link/MIDI"), a "Tempo Follower" section has been added below the "Link" section. A "Show Tempo Follower Toggle" switch shows/hides the "Follow" button in the Control Bar (Note: the Tempo Follower does not run when hidden). Its state is stored in the Preferences.cfg file. An "Input Channel (Ext. In)" chooser allows choosing the channel from which the tempo will be tracked, and displays a level meter for each channel. Its state is stored in the Preferences.cfg file.
When the "Follow" switch is visible in the Control Bar, it can be used to toggle the Tempo Follower on and off. Mappings can be assigned to this switch in Key/MIDI Map Mode.
Link, Tempo Follower, and External Sync are mutually exclusive (for instance, activating Tempo Follower will deactivate Link).
When the Tempo Follower cannot be connected to the audio input device channel specified in the Preferences, its Follow button is disabled in the Control Bar. When the Follow button is disabled, it is automatically set to Off and will not automatically switch on again when a valid audio source is selected.
Live Bugfixes
Fixed a crash that could occur while attempting to automate some controls in certain plug-ins.
Fixed some bugs in Max for Live devices:
The LFO device's modulation would not work if the device was instantiated while the audio engine was turned off.
The MPE Control device would cause stuck notes when automating multiple curve parameters during playback.
Fixed a bug in the browser's content pane that prevented the column settings from being correctly retained.
Live no longer crashes when right-clicking on a Send parameter in the Arrangement View, when that Send parameter is controlled by a Max device (e.g. LFO).
Fixed a bug where the Indexer would crash on macOS 10.15. Fixed a bug where the Live index would quit unexpectedly.
On macOS, Live does not crash in rare circumstances when audio interfaces change.
Previously, when dragging an audio sample into Live's browser after renaming it, the sample would appear with the wrong name.
Previously, the Session View would jump unexpectedly when selecting return tracks.
The text that appears upon successfully authorizing Live is now improved in all available Live languages.
Fixed a bug where dragging warp markers to the left in a long clip would reset the clip's segment BPM to the lowest value. Additionally, zoom-scrolling in the Detail View has received a complete technical overhaul that should be mostly unnoticeable, but will be the basis for smoother workflows in the future.
Fixed a bug that prevented the "Show in Places" context menu entry from appearing for folders in the browser's Collections section. Fixed a redundant log that could appear, under certain circumstances. Fixed some crashes that could occur, under certain circumstances.
Previously, when hot-swapping certain devices or chains, the search function did not work as expected in labels within the browser's "Places" section.
Previously, trying to drag a sample or preset from the browser would select all elements below it, under certain circumstances.
Max for Live Bugfixes
The way Max for Live devices are rendered and positioned in Live's UI has been overhauled. This fixes a range of bugs and improves the general experience of working with Max for Live devices, including improvements to focus, positioning, scrolling behavior and performance:
Trackpad scrolling did not work correctly when the mouse was over a Max for Live device.
Scrolling the Device View with a device containing a jit.pwindow on macOS would cause Live's UI to hang.
The Max for Live window was drawn alone and the focus was not regained by Live after saving a Max for Live device when Live was minimized.
A graphic lag would occur when switching between channels containing some Max for Live devices.
Dropping a Max for Live device onto Live's app icon while Live was minimized resulted in a floating Max for Live device.
Opening a Max for Live device from the system file manager while Live is minimized resulted in a floating Max for Live device.
Scrolling in the Device View would result in unsynchronized movements of the Max for Live device and the other devices in Live.
Дата Выпуска: 24.02.2021
Версия: 11.0
Разработчик: Ableton
Сайт разработчика: ableton.com
Разрядность: 64bit
Язык интерфейса: Английский
Таблэтка: Присутствует
Windows 10 (Build 1909 and later)
Intel® Core™ i5 processor or an AMD multi-core processor.
8 GB RAM
1366x768 display resolution
ASIO compatible audio hardware for Link support (also recommended for optimal audio performance)
Размер: 2.24 GB
Live позволяет вам легко создавать, производить и исполнять музыку в одном интуитивно понятном интерфейсе.
Live синхронизирует все и работает в режиме реального времени, поэтому вы можете воспроизводить и изменять свои музыкальные идеи, не прерывая творческий процесс.
Но Live также имеет революционный Session View: уникальный блокнот для импровизации, игры и исполнения с музыкальными идеями, без ограничений по времени.
Свободно и независимо запускайте и останавливайте любое количество аудио или MIDI-лупов - все остается синхронизированным. Почти все в Live работает в режиме реального времени - добавляйте, изменяйте порядок или удаляйте устройства, играйте с гибкой маршрутизацией треков Live и многим другим - и все это без прерывания творческого процесса. Создавайте более смелые звуки с новыми устройствами Live.
Оставайтесь в потоке с множеством улучшений рабочего процесса. Еще больше отдаляйтесь от компьютера с помощью Push. Создайте свой звук с помощью кураторской библиотеки. И получите неограниченный потенциал Max for Live, встроенный без проблем.
Инструкция установки и активации от старой версии, она слегка переделана для этой раздачи.
Действия почти те же. Различие лишь в названии файлов и заменой [exe]
1. Удалить или выключить установленный антивирус
2. Выключить защитник Windows
![Ableton - Live Suite v11.0 x64 R2R [24.02.2021] - секвенсор Ableton Live](https://i90.fastpic.ru/big/2019/1022/92/445fe8ed7de61107c7302d9601840392.png)
3. Скачать Ableton
3.1. Выключить интернет
4. Запустить установку от Админа


Если кнопка Next-Install не нажимается, то нужно удалить ярлык с меню пуска

Ждем...

Установилась
Убрать галочку с автоматического запуска, после завершения установки
5. Если на рабочем столе нет ярлыка, то значит он в меню пуска. Перетащить оттуда ярлык на рабочий стол. Открыть папку Локальный диск (C) > ProgramData > Ableton > Live 10 Suite > Program и переместить туда с заменой Ableton Live 10 Suite.exe , он находится в папке Crack, Готово.
6. Запусти программу. Жми

7. Жми

Предложит сохранить, сохрани его например на рабочий стол

8. Сразу откроется текстовый документ и ты скопируй это

9. Запусти кейген от имени Админа. Вставь код

10. Жми генерировать

Предложит сохранить файл лицензии. Ты его сохрани хоть на рабочий стол
11. Активируй вот так. Перемести файлик лицензии на окно активации Аблетона и отпусти кнопку ну или просто кликни два раза по нему

Если не перетаскивается файл авторизации, то это означает, что вы открыли Ableton от имени администратора.
12. Отключить автообновление

13. Вкючить интернет. Готово
Please check the Live 11 Technical FAQ for detailed information on specific topics:
https://help.ableton.com/hc/en-us/articles/360019140859
Arrangement View Improvements
Names of recorded clips in the Arrangement are now simplified and more consistent. The name consists of the track name (without the leading index number), and an index of the take number.
Upon creating a MIDI clip in the Arrangement View, the grid will start at a fixed sixteenth-note setting, as opposed to narrow-adaptive. Newly-recorded MIDI clips in the Arrangement will default to a sixteenth-note grid setting.
A new "Create Crossfades On Clip Edges" command creates four-millisecond crossfades on clip edges, when either a single or multiple adjacent whole clips are selected, or when a time selection contains more than two adjacent clips. The "Create Crossfades On Clip Edges" command is available in the Create menu, and the context menu of Arrangement clips, or via the "CMD"+"ALT"+"F" (Mac) / "CTRL"+"ALT"+"F" (Win) keyboard shortcut.
It is possible to change the selection of automation and take lane headers using the keyboard's Arrow Up/Down keys. The lane header selection can also be extended with using the "Shift" and Arrow Up/Down keys.
It is possible to move automation lanes and take lanes using the "CMD" and Arrow Up/Down (Mac) / "CTRL" and Arrow Up/Down (Win) keyboard shortcut.
Selected automation lanes or take lanes can be resized vertically by pressing "ALT" and "+" or "ALT" and "-", or by pressing "ALT" while using the mousewheel/pinch gesture. Also, when a track's main lane is selected, only that lane's height is affected.
Multiple selected automation lanes or take lanes can be resized by dragging the resize handles with the mouse. When holding the "ALT" modifier, all selected automation lanes or take lanes are resized simultaneously, similar to tracks.
A previous lane header selection is preserved after folding and immediately unfolding tracks again or when toggling Automation Mode.
When using the Zoom to Time Selection command in the Arrangement, Live now only zooms horizontally at first. When using the command a second time (without changing the time selection), Live then zooms vertically as well. Upon using the command a third time, the Arrangement returns to the first vertical zoom state.
Automation
Updated background and text colors for lane headers and clip backgrounds in Automation Mode.
Automation lane headers are now selectable with the mouse.
Clicking on an automation lane header now highlights that lane.
It is now possible to clear envelopes in automation lanes with selected lane headers, by using the "CMD"+"Backspace" (Mac) / "CTRL"+"Backspace" (Win) keyboard shortcut.
Clicking on a selected lane's Remove Automation Lane ("-") button now removes all selected automation lanes. Clicking on an unselected lane's Remove Automation Lane button removes only that lane.
Browser Improvements
A "Templates" label has been added to the Categories section of the browser. It shows template Live Sets from factory packs (including the Core library), the User Library, and other Project folders.
The current Live Set can be saved as a Template Live Set via the File menu's "Save Live Set As Template..." command.
The current Live Set can be saved as the default Live Set (which is used when creating new Live Sets) via the File menu's "Save Live Set As Default Set..." command.
Any Live Set in Live's browser can be set as the default Live Set (which is used when creating Live Sets) via the "Set Default Live Set" context menu entry.
A "Grooves" label has been added to the Categories section of the browser. It shows a flat list, similar to that within the Clips and Samples labels, of all Grooves from the Core Library as well as the User Library.
Devices in the Audio Effects label are now grouped into folders. As with other folders in the browser, it is possible to unfold more than one folder at once, by holding "Cmd" (Mac) / "Ctrl" (Win).
Ableton’s official Max for Live devices are now listed within the "Audio Effects", "MIDI Effects", and "Instruments" labels. The nodes can be expanded to reveal presets (.adv files) organized in virtual folders, if any exist. Presets outside of matching virtual folders are shown below the last virtual folder.
Drum Synth devices are now grouped in their own folder within the Instruments label.
The browser now receives the focus when opened via the "Cmd"+"Alt"+"B" (Mac) / "Ctrl"+"Alt"+"B" (Win) keyboard shortcut.
Capture MIDI
Added MPE support to Capture MIDI.
Clip/Detail View Improvements
Removed the Clip View Box selectors from the Clip View. The Clip box now contains controls available for both audio and MIDI clips, such as Start/End, Loop Position/Length, Clip Time Signature and Clip Groove.
Clicking the triangular toggle button in the Clip View's title bar shows or hides controls previously found in the Launch box, including Launch Mode, Clip Quantization, and Follow Actions.
Controls for editing samples/notes, envelopes, and note expression (for MIDI clips only) are now available in dedicated tabs to the right of the Clip box. Pressing "Alt"+"1" switches to the Samples/Notes tab, pressing "Alt"+"2" switches to the Envelopes tab, and, when a MIDI clip is selected, pressing "Alt"+"3" switches to the Note Expression tab.
The Clip Gain slider has been moved below the Transpose controls, and is now a text slider control.
The Transpose control now has a dial control for transposing in semitones, and a text slider control for fine-tune in cents (previously named "Detune").
Removed the Clip Color chooser from the Clip box.
It is now possible to rename or change the color of selected clip via the Clip box's context menu.
It is now possible to minimize/maximize the Clip box by double-clicking its title bar.
"Clip Volume" is now called "Clip Gain" in the Envelope tab's Device/Control choosers, and in the undo history.
Comping
Introduced comping in the Arrangement View. Comping makes it possible to pick the best moments of each recorded performance, and combine them into a composite track. You can record multiple takes of a musical performance without stopping recording. Live will then create and organize individual takes from this recorded material, allowing you to piece your favorite parts together. You can also drag samples from your library and use comping as a creative sample-chopping tool.
In the Arrangement View, take lanes are automatically added to armed audio and MIDI tracks during recording. Take lanes can also be inserted manually via the "Insert Take Lane" entry in the Create menu or a track header's context menu, or using the "Shift"+"ALT"+"T" keyboard shortcut. When adding a take lane via the Create menu, the take lane will be inserted after the selected lane. Otherwise, if a track is selected, the take lane will be inserted after the track's main lane. Inserting take lanes also works on multiple selected tracks simultaneously.
Take lanes are hidden by default. The visibility of take lanes can be toggled from a track header's "Show Take Lanes" context menu entry, or with a keyboard shortcut "CMD"+"ALT"+"U" (Mac) / "CTRL"+"ALT"+"U" (Win). Take lanes are only visible when Automation Mode is disabled.
Recording in the Arrangement View automatically creates a clip in a take lane.
Take lane clips can be edited like other Arrangement clips (e.g., they can be moved, copied/pasted, dragged & dropped, consolidated, cropped, etc.) They can also be copied to Session View clip slots by either copying and pasting or dragging and dropping.
Samples and MIDI files can be dragged to take lanes from the browser or Finder/File Explorer. When multiple samples are selected, pressing the "CMD" (Mac) / "CTRL" (Win) modifier key and dragging will insert each sample into sequential tracks and/or take lanes.
Selected material in take lanes can be placed in the track's main lane by pressing the "ENTER" key or via a take lane's "Copy Selection to Main Lane" context menu entry.
It is possible to replace clips in a track's main lane with the next/previous take lane clip, by selecting a clip or by making a time selection, and then pressing "CMD" and Arrow Up/Down (Mac) / "CTRL" and Arrow Up/Down (Win). If the time selection is on a take lane, it switches to the next/previous take lane clip. This also works when there is a selection of clips or time across multiple tracks, and when take lanes are hidden. (Note: empty take lanes are ignored.)
In Draw Mode, selected take lane material can be placed in the track's main lane in one single gesture by clicking, dragging and then releasing the mouse. It is also possible to quickly cycle between takes within a time selection by single-clicking on a take lane and immediately releasing the mouse.
A take lane can be auditioned by clicking the "Audition Take Lane" button (displayed as a speaker icon) in the take lane’s header, or using the "T" keyboard shortcut. When enabled, clips in the auditioned take lane will become audible and displayed in their full color, and all other lanes will be muted.
Pressing "T" toggles Audition Mode on take lanes that contain a time selection (or an insert marker) or if that take lane’s header is selected. Take lanes from different tracks can be auditioned at the same time, however only one take lane per track can be auditioned. If the time selection or lane header selection stretches across multiple lanes on the same track, the last selected lane will be auditioned.
For every Arrangement clip, Live will highlight its source material in a take lane by displaying it in full color, while dimming all unused take lane material. This makes it easier to track the recorded material that the clip originally came from. Source highlights will only be shown as long as the positions and the clip properties are matching.
Highlighted regions on take lanes can be resized to adjust the split point between two adjacent parts of a comp by dragging the edge of the highlight.
When the Clip Color toggle is set to Random in the Look/Feel Preferences, each take will be assigned a random color.
Take lane headers are selectable with the mouse. Clicking on a take lane header highlights that lane. Take lanes can be deleted via the Delete/Backspace key when their headers are selected. Take lanes can be renamed in the same way as tracks, via the "Rename" command in the Edit menu or the take lane header context menu, or using the "CMD"+"R" (Mac) / "CTRL"+"R" (Win) keyboard shortcut. Multiple selected take lanes can also be renamed simultaneously. Using the "Tab" or "Shift"+"Tab" keyboard shortcuts allows moving between lanes and tracks while renaming them. Selected take lanes can be reordered within their track via dragging and dropping. Take lanes can be selected and renamed during recording.
Take lane headers have a default info text. The info text of take lane headers can be edited using the Edit Info Text command from the context menu or the Edit menu.
Control Surfaces
The "MPK mini" control surface script is no longer available. The specific AKAI MPK mini model control surface script should now be used instead.
Control surface scripts that can control multiple banks of device parameters can now control the second set of eight Macro Controls (i.e., Macro 9-16) in Racks.
Follow Actions
Follow Actions controls can now be shown or hidden via the triangular toggle button in the title bar of the Clip View.
Follow Actions can now be assigned to scenes via the new Scene View. Clip Follow Actions will continue to run when a scene Follow Action is created or scheduled, however scene Follow Actions take precedence when triggered.
Follow Actions can be activated or deactivated using the selected clip/scene's "Follow Action" button. This button is disabled by default, and can be toggled using the "Shift"+"Enter" keyboard shortcut.
When enabling Follow Actions in a new clip/scene, Follow Action A is now set to "Next" by default.
An "Enable Follow Actions Globally" button has been added next to the Back to Arrangement button in the Session View. When disabled, no Follow Actions will occur in the Live Set, which allows editing running clips while preventing playback from jumping to other clips. When a Live Set does not contain any clip or scene Follow Actions, the "Enable Follow Actions Globally" button will appear grayed out.
A Session clip/scene with assigned Follow Actions is now indicated by a modified play button in its clip/scene slot.
Follow Action Chance A and Chance B values are now represented as percentages that sum to 100%. These values can be modified using a new slider control.
Added a marker to the Sample/MIDI Notes Editor that visualizes the Follow Action Time of a clip. This marker also allows dragging the clip's Follow Action Time. When Follow Actions are disabled via the "Enable Follow Actions Globally" button in the Master track, the Follow Action marker in the Detail View now appears in gray and black instead of green.
Added a new "Jump" Follow Action to clips and scenes. When Jump is selected, a new Jump Target slider becomes visible, to allow selecting a target clip slot/scene for the Follow Action to jump to.
Added a "Follow Action Linked" switch to the Follow Actions pane for clips. This switch is set to "Linked" by default. When the switch is set to "Linked", the Follow Action is triggered at the end of the clip or after the number of loops set in the "Follow Action Multiplier" field, and the Follow Action Time marker but cannot be moved. When the switch is set to "Unlinked", the Follow Action is triggered after the clip has played for the duration of the Follow Action Time.
Added a "Create Follow Action Chain" command to the context menu of Session clips, making it possible to set up Follow Actions so that all selected clips play in a loop. The clip selection does not have to be contiguous.
Interface Improvements
Updated Live's splash screen, application icon, and "About Live" box.
The CPU meter in the Control Bar can now display the peak CPU level. Peak CPU is a more reliable measure of CPU usage for the purpose of detecting dropouts. The percentage shown on the meter (indicating either the average or peak CPU level) can be selected from the CPU meter dropdown menu.
The Overload indicator (previously named the "Disk Overload" indicator) in the Control Bar has been redesigned, and will light up if a CPU overload has occurred. (Note: CPU overloads usually produce audio dropouts.)
CPU overload notifications can now be disabled in the Control Bar via a "CPU Overload Indication" entry in the CPU meter's dropdown menu, and in the Overload indicator's context menu.
Clicking on the new "Show/Hide CPU Meter Section" selector in the Session View's Mixer Section will open a per-track CPU metering section. Each track shows a CPU meter with six rectangles that light up to indicate the relative impact of that track on the CPU level of the current Set. Freezing or removing devices from the track with the largest impact will usually reduce the CPU load.
In the Look/Feel Preferences, the "Colors" section has been renamed "Customization".
Live’s Themes have been redesigned to provide much greater contrast.
Added a "Reduced Automatic Colors" toggle to the Look/Feel Preferences, which uses a reduced color palette when assigning colors to clips and tracks. This palette makes clips and tracks easier to tell apart with a deuteranopia, protanopia or tritanopia color vision deficiency.
Added a "Grid Line Intensity" slider to the Look/Feel Preferences, allowing for more pronounced or dimmed appearance of grid lines in the Arrangement and Detail Views.
On Windows, the progress of dialogs (such as the Export Audio dialog) is now displayed in the taskbar.
Progress dialogs now show their progress value below the bar, for easier reading in all Themes.
The scrollbar in the Help View now matches the colors of the scrollbar in the browser and the Groove Pool.
The vertical zoom level on the piano roll is now increased when dragging horizontally on the Note Ruler.
Added an "Arm Track" command to the Edit menu. If multiple tracks are selected, the command appears as "Arm Tracks". If the selected track is armed, the command is replaced with "Disarm Track". It is now possible to arm selected tracks using the "C" shortcut key.
Changed the font color of the "Drop Instrument Here" text in the Device View for improved contrast.
Reorganized the Edit menu for improved usability and accessibility, and added a new "Solo/Unsolo Track" entry.
Key/MIDI-mapped functionality for the "Set Start/End", "Set Loop Position/Length", and "Nudge Backward/Forward" buttons is now disabled whenever the corresponding controls in the GUI are disabled.
The "Browse Groove Library" context menu entry has been removed from the Groove Pool.
The Groove Pool now opens automatically when:
loading a groove file from the browser by double-clicking or pressing the Enter key
adding a groove to the Groove Pool (e.g., by dragging and dropping it onto an existing MIDI clip)
extracting grooves
Linked-Track Editing
Introduced linked-track editing in the Arrangement View. Linked-track editing makes it possible to use comping workflows and other phase-locked editing operations on multiple tracks at once. Any tracks in the Arrangement View can now be linked so that their content can be edited simultaneously. There can be multiple instances of linked tracks in a Set, however each track can only belong to one of these instances.
Linked tracks are indicated by a "link" icon button in their headers.
Clicking on a track's link icon selects all tracks that are linked together.
Hovering a track's link icon highlights tracks that are linked together.
Tracks can be linked by selecting them and then choosing "Link Tracks" from the context menu. To link tracks inside a Group Track, right-click on the Group Track header and choose "Link Tracks" from the context menu.
To unlink all tracks in an instance of linked tracks, right-click on the link icon button to select all tracks in that instance and open the context menu, and then choose "Unlink Track(s)" from the context menu. When unlinking tracks inside a Group Track, is it also possible to right-click on the Group Track header and choose "Unlink Track(s)" from the context menu.
To link an additional track to an instance of linked tracks, first click on the link icon button, to select all tracks in that instance. Then, add more tracks to the selection while holding the "CMD" (Mac) / "CTRL" (Win) key, and choose "Link Tracks" from the context menu.
To remove one or more tracks from an instance of linked tracks, select the corresponding track header(s) and choose "Unlink Track(s)" from the context menu.
Any subset of linked tracks, or a mix of linked and unlinked tracks, can be linked together by selecting their track headers and clicking the "Link Tracks" command in the context menu.
The following controls and operations are synced on linked tracks:
Track editing and time selection operations (e.g., Cut, Copy, Duplicate Time, Delete Time, etc.)
The state of Arm buttons
Take lane editing and time selection operations, such as auditioning, renaming, inserting and deleting take lanes (note: this also applies when take lanes are hidden in some linked tracks)
Fade operations, when clip edges have matching time positions
When one or more track headers are selected, pressing "Cmd" (Mac) / "Ctrl" (Win) and clicking on a track's link icon will select the originally selected track, as well as all linked tracks belonging to the linked track's instance.
When one or more track headers are selected, pressing "Shift" and clicking on a track's link icon will select all tracks from the originally selected track to the newly-clicked track, as well as all linked tracks belonging to the linked track's instance.
Matching fades on linked tracks can be adjusted relative to their original values. When linked tracks have matching fades, dragging the fade handles to their original start/end clip edges, then releasing the mouse, and then dragging the fade handles to their opposite clip edges will still result in fades of equal length.
Max for Live Improvements
Updated the bundled Max build to version 8.1.9. For the changelog, visit: https://cycling74.s3.amazonaws.com/support/version_8_1_9.html
When a parameter is controlled by a Max for Live device, a message in the Status Bar now shows exactly which device controls the parameter, and which track contains the device. The context menu of the controlled parameter now provides a "Go to Controlling Device" option.
A parameter that is controlled or automated by a Max for Live device will no longer incur a one-buffer delay in the signal sent by Max for Live, if the device containing the controlled parameter is positioned later than the Max for Live device in the device chain. The original delay behavior can be restored using the "-AlwaysDelayMaxForLiveMappings" debug option in the Options.txt file.
The following improvements have been added to MIDI routing:
It is now possible to route MIDI to and from Max for Live audio effects.
Max for Live instruments can now send out MIDI.
The new inputs and outputs are routable and show up in a track's "MIDI From" and "MIDI To" choosers.
Similar to audio routings, the Live API can control the routable MIDI inputs and outputs.
The Max for Live API now has access to:
A redesigned, extendable note API for Live 11's new note features (i.e., note probability, velocity range and release velocity). This new API is required for modifying notes without losing MPE data.
The sample rate of a Sample loaded in Simpler.
The slices of a Sample loaded in Simpler.
A Clip or Sample's warp markers.
The Clip launch properties: Legato mode, Launch mode, Clip quantization and Velocity amount.
Arrangement View Clip IDs in a Track.
Adding or removing Macro Controls in a Rack.
Macro randomization.
Macro Control variations.
The Live Set's Groove Pool.
A Groove's properties.
The Max for Live category in the Max Patcher Inspector window contains a new attribute "Patch supports MPE", to enable MPE for devices that make use of MPE features.
MIDI Clip Scales
A new Scale Mode can be enabled/disabled via the "Scale" button in the Clip box of MIDI clips. At the right side, "Root Note" and "Scale Name" choosers allow setting a root note and scale for the selected clip(s). When a selected clip has Scale Mode enabled and a scale is selected, notes belonging to the scale are highlighted in the piano roll. By default, key tracks belonging to the selected scale are highlighted in the MIDI Note Editor, and the root note is indicated by a prominent highlight in the piano roll. Scale highlighting can be toggled on or off, by pressing the "K" shortcut key while the MIDI Note Editor is in focus, or via the "Highlight Clip Scale" context menu and View menu entry.
Newly-created MIDI clips inherit the previously edited or viewed clip scale, even if they have Scale Mode disabled. When editing multiple clips with different key and scale settings, any foreground clip with Scale Mode enabled now updates the global settings that are used to initialize the next created clips, as well as Push's key and scale.
When a selected clip has Scale Mode enabled and a scale is selected, pressing the new "Scale" ("Fold to Scale") button (at the right of the "Fold" button) folds to key tracks containing notes, as well as key tracks belonging to the scale.
It is now possible to set a preference for spelling a clip's notes with flats, sharps, or both, via the piano roll's context menu. An additional "Auto" option automatically selects flats or sharps based on the position of the root note in the circle of fifths.
MIDI Note Editing
A new Chance Editor allows setting the probability of a MIDI note occurring in a playing clip. Dragging a note's probability marker up and down changes the probability value between 0-100%. The Chance Editor lane is hidden by default.
The Velocity and Chance Editor lanes can be shown or hidden via the lane selector toggle buttons at the left. Underneath the lane selector toggle buttons, a triangular toggle button allows showing/hiding all enabled lanes at once. When both lane selectors are hidden/disabled, pressing the triangular toggle button will show both lanes at once.
The Velocity and Chance Editor lanes can be resized individually via their split lines.
The Velocity and Chance Editor lanes can be resized at once by dragging the split line between the lanes and the MIDI Note Editor.
A "Randomize" button allows randomizing velocity/probability values for selected notes (or notes with selected markers), depending on the focused lane. If no markers are selected, values for all notes will be randomized.
A "Randomize Range" slider, at the right of the Randomize button, allows specifying a randomization range that can be applied to velocity/probability values. The slider's randomization value can be typed as a number with the keyboard, and triggers randomization when validated using the "Enter" key.
Notes with probability values less than 100% will display a little triangle on their upper-left corners. When a key track height is low enough, this triangle will disappear.
It is possible to edit probabilities for selected notes in Draw Mode.
Updated the appearance of Velocity markers.
The value of dragged velocity/probability markers is now indicated on the scale inside the respective lane header, instead of with a value box.
It is now possible to edit values for selected velocity/probability markers using numerical keys.
Holding the "Shift" key allows fine-tuning the values of selected velocity/probability markers.
When using the Arrow Up/Down keys with "Cmd" (Mac) / "Ctrl" (Win) held down, the values of selected velocity/probability markers are incremented by +/-10.
It is now possible to edit velocity values for selected notes using numerical keys.
It is now possible to see and edit a velocity range, from which a velocity value is selected when a note is played. In the Notes tab, a "Velocity Range" slider allows assigning velocity ranges to selected notes (or all notes in a single clip, if none are selected). Alternatively, holding "Cmd" (Mac) / "Ctrl" (Win) and dragging vertically on a velocity marker reveals a horizontal handle, which, when dragged up or down, sets the maximum or minimum velocity range value. The velocity range is indicated by the shaded area between the horizontal handle and the velocity marker. Double-clicking the velocity marker will reset the range to 0.
In the Velocity Editor, when using the Arrow Up/Down keys with "Cmd" (Mac) / "Ctrl" (Win) held down, the velocity ranges of selected notes are incremented by +/-10.
In the Velocity and Chance Editors, drawing ramps for selected notes or notes in a selected key track is now possible by holding the "Cmd" (Mac) / "Ctrl" (Win) modifier when Draw Mode is activated.
It is now possible to choose between two different Draw Mode options. In the Record/Warp/Launch tab of the Preferences, a new "MIDI Note Drawing" section has a "Draw Mode with Pitch Lock" option. When enabled, drawing MIDI notes is constrained to one single key track (or pitch) at a time, while holding the "ALT" key allows freehand melodic drawing. When disabled, Draw Mode defaults to melodic drawing, and holding the "ALT" key enables pitch-locked drawing. The "Melodic" Draw Mode can be used to erase notes, when drawing starts on an existing note. When the MIDI Note Editor is focused, the "Draw Mode" entry in the Options and context menu now display the currently selected state of the "Draw Mode with Pitch Lock" preference, as "Pitch Lock On/Off".
It is now possible to change the note selection in the MIDI Note Editor using the "Alt"+Arrow Up/Down keys (Mac) / "Ctrl"+Arrow Up/Down keys (Win).
MPE Support & Editing
Added support for MIDI Polyphonic Expression (MPE). It is now possible for Live to receive per-note expression from an MPE-capable MIDI controller, by enabling MPE Mode in the Link/Tempo/MIDI Preferences. When a MIDI controller that has MPE Mode enabled is selected as an input device on a track, the channel input routing is fixed to "All Channels" and no individual channels can be selected.
The Clip View's new Note Expression tab allows editing five dimensions of MIDI Polyphonic Expression (MPE) for each note in a clip: Pitch (per-note pitch bend), Slide (per-note Y-Axis), Pressure (Poly Aftertouch/MPE Press), Velocity and Release Velocity (Note-Off Velocity). This makes it possible to refine the expression of recorded material, or to automate polyphonic sound variations for MPE-capable instruments.
The Slide, Pressure, Velocity, and Release Velocity dimensions are displayed inside new expression lanes below the MIDI Note Editor.
Each expression lane can be shown or hidden via the lane selector toggle buttons at the left. Underneath the lane selector toggle buttons, a triangular toggle button allows showing/hiding all enabled lanes at once. When all expression lane selectors are hidden/disabled, pressing the triangular toggle button will show all expression lanes at once.
Each expression lane can be resized individually via their split lines.
All expression lanes can be resized at once by dragging the split line between the lanes and the MIDI Note Editor.
Pressing "ALT" and clicking the "Show/Hide All Expression Editors" button displays all expression lanes, regardless of their previous states. When hiding the expression lanes using the "Show/Hide All Expression Editors" button, or by dragging the "Expression Editor View Split", the lane visibility toggles are hidden as well.
When clicking a note (or any of its expression dimensions) in the MIDI Note Editor while the Note Expression tab is open, the note will appear in a transparent overlay. Breakpoints appear, allowing to edit the note's Pitch, Slide, and Pressure envelopes, while markers can be used to edit the note's Velocity and Release Velocity values. Unselected notes will appear grayed out, and their expression envelopes will be dimmed.
It is possible to edit expression envelopes for multiple selected notes at once. The expressions are scaled proportionally, similar to that of velocities for multiple selected notes.
In the Note Expression tab, the grid is disabled by default for easier editing at a finer resolution. The grid's settings are separate from the grid in the other tabs, and they are saved with the clip.
All expression dimensions can be edited in Draw Mode.
When a note is moved, its expression envelopes will move along with it.
Pitch envelopes are displayed on top of their corresponding notes in the MIDI Note Editor.
Pitch breakpoints snap to the nearest semitone when pressing "Cmd" (Mac) / "Alt" (Win) while the grid is off. This also works for Pitch values in Draw Mode. This behaviour can be inverted using the same shortcuts when the grid is on.
Pitch envelopes are hidden when Fold Mode is enabled in the Note Expression tab.
Multi-Clip Editing
It is now possible to select and edit notes from multiple selected clips at the same time in the MIDI Note Editor. The new "Focus" button enables Focus Mode, which allows editing the current foreground clip only. Focus Mode can be toggled via the "N" keyboard shortcut. Holding "N" while editing with the mouse toggles Focus Mode momentarily.
Loops are now visible and editable via mouse interactions. It is possible to select/edit several multi-clip loop bars at once, by clicking them/dragging their loop markers while pressing the "Cmd" (Mac) / "Ctrl" (Win) modifier key. In Focus Mode, it is not possible to select more than one multi-clip loop bar at a time, and any existing multi-selection is ignored.
When Focus Mode is disabled, It is possible to create a contiguous multi-selection of multi-clip loop bars by clicking them while holding the "Shift" modifier key. When Focus Mode is enabled, any existing multi-selection is ignored.
When multiple clip loops or or their loop start/end markers are selected, the selection is retained when dragging another one of these parameters without using keyboard modifiers.
The loop bar region is vertically resizable.
All controls in the Clip box and Notes tab of the Detail View that were previously only visible for a single selected MIDI clip now also appear when multiple MIDI clips are selected. When Focus Mode is enabled while multi-clip editing, the loop length controls and Notes tools are now available for editing the active clip.
Previously when crossing a loop boundary while making a rubberband selection, all notes were selected. Now, only the notes that are inside the selection rectangle are selected.
When Focus Mode is enabled, the title bar of the Clip box in the Detail View now appears in the active clip's color.
When Focus Mode is disabled, "Scale" is enabled and will fold key tracks according to the scales of all clips in the selection that have Scale Mode enabled. "Scale" is disabled if none of the clips in the selection has Scale Mode enabled.
When Focus mode is enabled, "Scale" is enabled and folds key tracks to the scale of the foreground clip, if the foreground clip has Scale Mode enabled. "Scale" is disabled if the foreground clip has Scale Mode disabled.
It is now possible to transpose notes across multiple selected clips using the Transpose control in the Notes tab.
The Invert button is now enabled in the Notes tab when at least one note is selected, and it is possible to invert selected notes from multiple clips at the same time. The inversion is not applied on a per-clip basis, but for the selection as a whole - as if all selected notes belonged to one clip.
It is now possible to use the Set Loop Position and Set Loop Length buttons when multiple MIDI clips are selected and playing.
It is now possible to use the Loop Position and Loop Length controls when multiple MIDI clips are selected.
It is now possible to use the Nudge Backward/Forward buttons when multiple MIDI clips are selected.
New Devices and Device Improvements
The old Chorus, Flanger, and Phaser devices have been deprecated. They are still accessible via a Legacy folder in the Core Library under Devices -> Audio Effects.
The number of visible Macro Controls in Instrument Racks can now be controlled from a Max for Live device or a control surface.
Added MPE support to Drum Racks and Instrument Racks. Per-note expression is forwarded through Racks.
Added MPE support to all built-in MIDI effect devices. Per-note expression is forwarded through these devices.
The Arpeggiator device now supports modulating the root notes of an arpeggio via MPE. (Note: MPE modulation is not applied to transpositions generated by the device.)
Added support for MPE and Push 2's "Poly" Pressure mode to the External Instrument device.
Toggling MPE Mode in a plug-in device is now possible via the device's context menu. When MPE is enabled, an indicator appears on the device's title bar. Plug-in devices that support MPE now have MPE Mode enabled by default.
Sampler:
Sampler now supports MPE. It is now possible to use MPE/Push 2's Pressure mode to modulate individual notes in the Sampler device. MPE modulation can be dialled in via Sampler's MIDI tab.
In the MIDI tab, the Pitch Bend Range control has been repositioned and two new modulation sources have been added: "Note PB" (per-note pitch bend) and "Slide" (per-note Y-Axis).
In the MIDI tab, Aftertouch has been repositioned and renamed to "Press". Depending on the data sent to the instrument, Press is handled either monophonically (as Channel Aftertouch) or polyphonically (as Poly Aftertouch or MPE Press).
Added an "MPE" text label to the right corner of the Sampler device's title bar.
Simpler:
Simpler now supports MPE. It is now possible to use MPE/Push 2's Pressure mode to modulate individual notes in the Simpler device.
By default, Simpler supports Note PB (per-note pitch bend) with a range of +48 semitones.
It is possible to use Sampler's MPE Slide and Press parameters in Simpler, after an instance has been converted from Sampler.
Added an "MPE" text label to the right corner of the Simpler device's title bar.
Wavetable:
In the MIDI tab, "AT" (Aftertouch) has been renamed to "Press". Depending on the data sent to the instrument, Press is handled either monophonically (as Channel Aftertouch) or polyphonically (as Poly Aftertouch or MPE Press).
Wavetable can now be fully controlled using MPE controllers. MPE modulation can be dialled in via the new MPE tab, which contains four columns: Velocity, Note PB (per-note pitch bend), Slide (per-note Y-Axis) and Press (aftertouch). All MPE modulation sources now appear in the device's expanded view.
Added an "MPE" text label to the right corner of the Wavetable device's title bar.
Collision:
Updated the appearance of the Collision device's UI.
Corpus:
Updated the appearance of the Corpus device's UI.
Electric:
Updated the appearance of the Electric device's UI. The "Tine" and "Tone Bar" parameters are now consistently named.
Tension:
Updated the appearance of the Tension device's UI.
Chorus-Ensemble:
Introduced "Chorus-Ensemble", a new audio effect device for Live. Chorus-Ensemble provides three different effect modes:
Classic is a thickening chorus effect. A high-pass filter allows removing the chorus signal from low frequencies. The width of the chorus signal can be adjusted; this is useful for complex mixing tasks. The feedback signal can be inverted, which results in a "hollow" sound when combined with high feedback values.
Ensemble is based on and shares controls with the Classic mode, while adding a third phase-shifted delay line for a thicker chorus sound.
Vibrato applies stronger modulation than a chorus to create pitch variation. The shape of the modulation waveform can morph seamlessly from a sine to a triangle, and be used to create well-known "police siren" sounds.
Global controls allow setting the modulation rate and amount, output gain, and harmonic saturation (via the "Warmth" parameter).
Hybrid Reverb:
Introduced "Hybrid Reverb", a new audio effect which allows blending a convolution reverb with a number of reverb algorithms. Besides providing a selection of impulse responses, the device allows dragging any audio file into the device to be used for the convolution processing, as well as shaping the envelope and size of impulse responses via dedicated controls. An algorithmic section contains several reverb modes, each providing a different set of parameters and sonic properties: Dark Hall, Prism, Quartz, Shimmer, and Tides. The convolution and algorithmic sections can be routed either in series or parallel, and their volume relationship can be continuously adjusted via a Blend control. An EQ section can be used to shape the reverb sound, and a "Pre Algo" toggle allows excluding the convolution engine from the EQ. A "Vintage" control introduces a degradation of the signals, to emulate the behavior of older digital reverb units.
MPE Control:
Introduced "MPE Control", a Max for Live MIDI effect that allows shaping and transforming incoming MPE modulation for Pressure (polyphonic aftertouch, Slide (per-note Y-Axis) and Pitch (per-note pitch bend). The MPE data is transformed via curves, which can consist of either two or three breakpoints. MPE Control also allows smoothing modulation data and can convert MPE data to global MIDI, so that non-MPE instruments can be modulated monophonically via an MPE controller as well.
Phaser-Flanger:
Introduced "Phaser-Flanger", a new audio effect device for Live. Phaser-Flanger combines the functionalities of the Phaser and Flanger devices into one, as separate effect modes. The Phaser mode has a new, lusher sound with increased frequency and modulation ranges, while the previous Earth and Space modes have been replaced with more expressive parameters. Also included is a new Doubler effect mode.
Redux:
Upgraded the Redux device. New parameters allow creating a wider range of sounds, from harsh distortion to digital and aliasing artifacts, through to warm and fat 8-bit sounds. Jitter adds noise to the downsampling process. Filters can be enabled pre/post downsampling, while the post-filter cutoff frequency can be adjusted. A Shape parameter allows transforming the quantizer's curve. DC Shift and Dry/Wet controls are also available.
Spectral Resonator:
Introduced "Spectral Resonator", a new audio effect device for Live. Based on spectral processing, Spectral Resonator uses spectral resonances and pitched overtones to add tonal character to any audio source. MIDI sidechain parameters allow processing any material in key with its surrounding musical elements. Spectral Resonator can be played polyphonically in MIDI mode with up to 16 voices. Spectral Resonator offers several spectral processing types on the input signal, including spectral filtering, spectral chorus, and granularization.
Spectral Time:
Introduced "Spectral Time", a new audio effect device for Live. Spectral Time combines time freezing and spectral delay effects in a single inspiring device. The freeze and delay effects can be used together or independently, allowing for a wide range of possibilities, such as sustaining any sound infinitely, or combining delays with time-synced fade transitions.
Max for Live Device Updates
Added support for MPE input to/output from Max for Live devices. When a Max for Live device has MPE Mode enabled, MIDI output from the device will be interpreted as MPE. Additionally, when a Max for Live device is disabled, MPE will be forwarded through the device's dry signal path.
The Expression Control device now allows assigning an additional parameter as a mapping target. Pressing a new button in the upper right corner of the LED opens a new view, where each modulation target can be transformed via curves and breakpoints. New modulation sources have been added to the device:
Expression (Expression Controller, MIDI CC 11)
Random (allows generating a random modulation value per note)
Incremental (allows adding a fixed amount to the modulation value with each new note)
Slide (per-note Y-Axis, converted to monophonic modulation data; useful when controlling effects in a device chain via an MPE controller)
Sustain (Sustain Pedal, MIDI CC 64)
All Max for Live devices have been moved inside the application bundle (previously, they lived in the Core Library), to ensure that using Collect All and Save will not create redundant copies of the devices.
Improved waveform drawing in the Shaper and Envelope Follower devices.
Push
Added a "Pressure" switch to Push 2's Setup Menu (shown when pressing the Setup button) that allows toggling between monophonic and polyphonic aftertouch when playing melodic instruments. The state of this switch is stored in Live's preferences. Push 2 and MIDI controllers sending polyphonic aftertouch can be used with plug-in devices that support polyphonic aftertouch.
When Push 2's Pressure mode is set to "Poly", the Repeat button now produces notes at full velocity when Accent is enabled.
When a Rack contains a parameter mapped to one of the new Macro Controls (i.e., Macro 9-16), the additional Macro Control parameters will appear in a new device within the Rack. Degree symbol icons (Push 1) or bullet point icons (Push 2) are used to differentiate the Rack from the device. The new device is only visible when the Rack is open, but otherwise behaves exactly the same as the Rack.
Push MIDI Clip Mode
When Push's In Key/Chromatic is set to In Key Mode, and the selected MIDI clip has Scale Mode enabled, selecting a scale on Push will update that clip’s scale in Live. If Focus Mode is enabled in multi-clip editing, only the foreground clip's key and scale will be updated in Live.
When Push's In Key/Chromatic is set to In Key Mode, and the selected MIDI clip has Scale Mode enabled, selecting a scale in Live will change the pad layout on Push.
Rack and Macro Control Improvements
Pressing the "Rand" button in the title bar of a Rack randomizes the values of mapped Macro Controls. A mapped Macro Control can be excluded from randomization via the "Exclude Macro from Randomization" context menu option. Volume Macros in Instrument Rack presets are excluded from randomization by default.
A new "Show/Hide Macro Variations" view selector button in Racks opens a view that allows storing the state of the Macro Controls as a variation preset via the "New" button. By default, each stored variation will be named sequentially as "Variation 1", "Variation 2", etc. A variation can be renamed, duplicated or deleted via its context menu, the Edit menu, or using keyboard shortcuts. A variation can be launched in its stored state via the "Launch Macro Variation" button to the right, or overwritten via the "Overwrite Macro Variation" button to the left. Additional controls are visible in Key/MIDI Map Mode.
The maximum number of available Macro Controls in Live has been doubled to 16. New "+" and "-" view selector buttons in Racks allow setting how many Macro Controls are shown or hidden. The state of the shown and hidden Macro Controls is saved in the Live Set. When the title bar of a Rack is narrow enough, the Rand and Map buttons will appear as "R" and "M".
Added a context menu entry that excludes a Macro Control from changing when a different Macro Control variation is launched. Unchecking the context menu entry will re-enable changes to that control as before, as the values are still stored in the variation.
Session View Improvements
In the Default Live Set, scene name fields will be empty and no longer contain numbers.
Scene numbers are now displayed in a new column in the Master track.
Scene numbers are determined by their position. When a scene is moved, its number changes according to the scene's new position.
Selecting a scene (or multiple scenes) now opens the new Scene View, which allows editing the selected scene's tempo, time signature and Follow Actions.
Dragging the left edge of the Master track's title header reveals two new controls, which allow assigning a tempo or time signature to a scene. When enabled, these controls can be disabled and reset via a context menu or pressing the Delete key. It is also possible to disable the controls by double-clicking them. Clicking a Scene Tempo or Scene Time Signature control opens the Scene View.
When a scene or clip slot is selected, the Arrow Right/Left keys can now be used to navigate to the Scene Tempo/Time Signature controls.
When a Scene Tempo/Time Signature control is selected in the Master track, pressing "Enter" once will select the respective scene header. Pressing "Enter" again launches the selected scene.
When editing a scene name, tempo or time signature value in the Master track using the keyboard, using the "Tab" or "Shift"+"Tab" keyboard shortcut navigates to the next or previous control, to allow editing these controls quickly. The navigation moves to the next or previous scene when reaching the last or first control in a scene.
Sets created in Live 10 that have tempo and/or time signature values specified by scene names will have their values migrated to the new Scene Tempo/Time Signature controls, and, when such Sets are first opened in Live 11, the Master track is widened so that the Scene Tempo/Time Signature columns are visible.
In the Scene View, if a scene does not have a name, and only one scene is selected, the word "Scene" is displayed in the title bar. The scene number is displayed on the right-hand side of the title bar.
It is now possible to rename multiple selected clips at once, via the Rename command in the context menu or Edit menu, or using the "CMD"+"R" (Mac) / "CTRL"+"R" (Win) keyboard shortcut.
Added a "Cancel Scene Launch" entry to the Master track's context menu. Clicking this entry cancels the launch of any previously triggered scene.
Added a "Cancel Scene Launch" button to the Master track in Key/MIDI Map Mode.
It is now possible make the Master track narrower, so that Master Volume value labels can be hidden. The "Solo" label of the Solo/Cue Mode switch in the Master track now appears centered.
The "Stop All Clips" button in the Master track now flashes when clicked, and blinks while fired and waiting for the next launch period, similar to all other "Clip/Scene Launch" and "Clip/Scene Stop" buttons. This also works when a scene's "Stop" Follow Action is triggered.
Setup
Live requires macOS 10.13 or later.
Live's Status Bar will now indicate when an update for Live is being downloaded. Once it is downloaded, the Status Bar will state that Live must be restarted in order to apply the update. It is possible to change this default behavior, so that Live will first ask for permission before applying a new available update. To do so, go to Preferences -> Licenses/Maintenance and set Get Automatic Updates to Ask Me. The next time an update for Live is available, the Status Bar will display buttons for choosing whether or not to apply the update.
ReWire support has been removed.
Tempo Follower
Introduced the Tempo Follower, which adapts Live’s tempo to stay in time with a drummer or another rhythmic audio source. In the Preferences via the "Link/Tempo/MIDI" tab (previously named "Link/MIDI"), a "Tempo Follower" section has been added below the "Link" section. A "Show Tempo Follower Toggle" switch shows/hides the "Follow" button in the Control Bar (Note: the Tempo Follower does not run when hidden). Its state is stored in the Preferences.cfg file. An "Input Channel (Ext. In)" chooser allows choosing the channel from which the tempo will be tracked, and displays a level meter for each channel. Its state is stored in the Preferences.cfg file.
When the "Follow" switch is visible in the Control Bar, it can be used to toggle the Tempo Follower on and off. Mappings can be assigned to this switch in Key/MIDI Map Mode.
Link, Tempo Follower, and External Sync are mutually exclusive (for instance, activating Tempo Follower will deactivate Link).
When the Tempo Follower cannot be connected to the audio input device channel specified in the Preferences, its Follow button is disabled in the Control Bar. When the Follow button is disabled, it is automatically set to Off and will not automatically switch on again when a valid audio source is selected.
Live Bugfixes
Fixed a crash that could occur while attempting to automate some controls in certain plug-ins.
Fixed some bugs in Max for Live devices:
The LFO device's modulation would not work if the device was instantiated while the audio engine was turned off.
The MPE Control device would cause stuck notes when automating multiple curve parameters during playback.
Fixed a bug in the browser's content pane that prevented the column settings from being correctly retained.
Live no longer crashes when right-clicking on a Send parameter in the Arrangement View, when that Send parameter is controlled by a Max device (e.g. LFO).
Fixed a bug where the Indexer would crash on macOS 10.15. Fixed a bug where the Live index would quit unexpectedly.
On macOS, Live does not crash in rare circumstances when audio interfaces change.
Previously, when dragging an audio sample into Live's browser after renaming it, the sample would appear with the wrong name.
Previously, the Session View would jump unexpectedly when selecting return tracks.
The text that appears upon successfully authorizing Live is now improved in all available Live languages.
Fixed a bug where dragging warp markers to the left in a long clip would reset the clip's segment BPM to the lowest value. Additionally, zoom-scrolling in the Detail View has received a complete technical overhaul that should be mostly unnoticeable, but will be the basis for smoother workflows in the future.
Fixed a bug that prevented the "Show in Places" context menu entry from appearing for folders in the browser's Collections section. Fixed a redundant log that could appear, under certain circumstances. Fixed some crashes that could occur, under certain circumstances.
Previously, when hot-swapping certain devices or chains, the search function did not work as expected in labels within the browser's "Places" section.
Previously, trying to drag a sample or preset from the browser would select all elements below it, under certain circumstances.
Max for Live Bugfixes
The way Max for Live devices are rendered and positioned in Live's UI has been overhauled. This fixes a range of bugs and improves the general experience of working with Max for Live devices, including improvements to focus, positioning, scrolling behavior and performance:
Trackpad scrolling did not work correctly when the mouse was over a Max for Live device.
Scrolling the Device View with a device containing a jit.pwindow on macOS would cause Live's UI to hang.
The Max for Live window was drawn alone and the focus was not regained by Live after saving a Max for Live device when Live was minimized.
A graphic lag would occur when switching between channels containing some Max for Live devices.
Dropping a Max for Live device onto Live's app icon while Live was minimized resulted in a floating Max for Live device.
Opening a Max for Live device from the system file manager while Live is minimized resulted in a floating Max for Live device.
Scrolling in the Device View would result in unsynchronized movements of the Max for Live device and the other devices in Live.
cкачиваний: 1711
Тэги: секвенсор Ableton Live


Комментариев 5